

How To Set Permissions On A Shared Folder In Windows 10
-
Open Windows Explorer by pressing the Windows cardinal and clicking Figurer; then scan to the folder whose permissions yous want to manage.
-
Correct-click the binder you lot want to manage and so cull Backdrop from the contextual menu.
The Properties dialog box for the binder appears.
-
Click the Sharing tab; then click Advanced Sharing.
The Advanced Sharing dialog box appears.
-
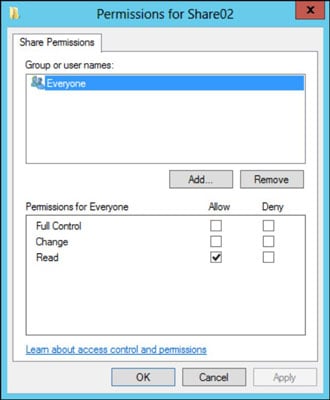
Click Permissions.
The dialog box shown appears. This dialog box lists all the users and groups to whom you've granted permission for the folder. Initially, read permissions are granted to a group called Anybody, which means that anyone can view files in the share but no one can create, alter, or delete files in the share.
When y'all select a user or group from the list, the check boxes at the bottom of the list change to indicate which specific permissions you've assigned to each user or group.
-
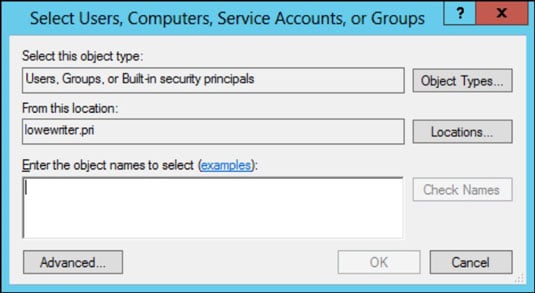
Click the Add button.
The dialog box shown appears.
-
Enter the name of the user or group to whom you want to grant permission and and so click OK.
If you're non sure of the proper noun, click the Advanced push. This action brings upwardly a dialog box from which y'all tin can search for existing users.
When yous click OK, you return to the Share Permissions tab, with the new user or grouping added.
-
Select the advisable Allow and Deny check boxes to specify which permissions to let for the user or group.
-
Repeat Steps 5–seven for whatsoever other permissions that you want to add.
-
When you're done, click OK.
-
If you lot want to grant full access to anybody for this folder, don't carp adding another permission. Instead, select the Everyone grouping and then select the Allow check box for each permission type.
-
You can remove a permission past selecting the permission and and then clicking the Remove push.
-
If you lot'd rather not fuss with the Share and Storage Management panel, you can set up the permissions from My Computer. Correct-click the shared folder, cull Sharing and Security from the contextual menu, and so click Permissions. And then you can follow the preceding process, picking up at Pace five.
-
The permissions assigned in this procedure apply only to the share itself. The underlying folder can as well have permissions assigned to it. If that's the case, whichever of the restrictions is most restrictive always applies. If the share permissions grant a user Full Command permission merely the binder permission grants the user only Read permission, for example, the user has only Read permission for the binder.
About This Article
This commodity tin can be establish in the category:
- General (Networking) ,

How To Set Permissions On A Shared Folder In Windows 10,
Source: https://www.dummies.com/programming/networking/network-administration-granting-share-permissions/
Posted by: connorsseent1983.blogspot.com
0 Response to "How To Set Permissions On A Shared Folder In Windows 10"
Post a Comment