

How To Scan From Canon Printer To Computer Windows 10
Before you brainstorm
-
Install printer drivers on your calculator - Utilize the Setup CD-ROM that came with your printer or download the drivers from the PIXMA MX922 Downloads & Drivers support tab .
-
Connect the printer to your calculator - Acquire how to employ a USB cable or connect via Wi-Fi on the network .
-
Specify the destination and file name - The default location is the Documents binder unless you change the settings using the Canon IJ Scan Utility .
-
Discover out how to scan multiple pages to create a single document .
-
Learn how to scan a photo or documents when you lot showtime a scan from your estimator.
Steps to scan to a Windows reckoner
-
Make sure your printer is turned on, then press the SCAN button.
-
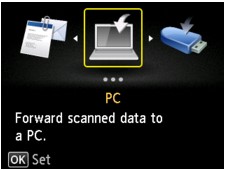
Cull the connected computer where your scanned images will be saved.
-
If your just connected computer is connected past a USB cable, you should see the scan standby screen and tin can proceed to pace
-
To choose the destination reckoner, use the

 arrow buttons to select PC. Press OK.
-
Use the

 arrow buttons to select the computer ready to save your scanned images, and so press OK.

-
-
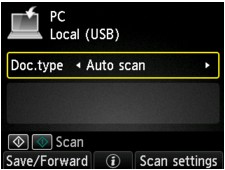
Use the
arrow buttons to select the document type to apply relevant settings as specified in Browse settings. You lot can select Auto scan when you lot're saving to a USB-connected computer.
-
With Auto scan, the printer automatically detects the type of the originals and adjusts the scan settings to optimal size, resolution, and information format.
-
If the scanning consequence with Auto scan is not satisfactory, select Certificate or Photo.
-
Press the right Function button if you want to adjust browse settings, such as the scan size, resolution, or information format. Use the
arrow buttons to select the setting particular or the
arrow buttons to specify the setting, then press OK. -
Load the original document or photo on the scanning surface (platen drinking glass) or in the automated document feeder (ADF).
-
Press the Color push button for color scanning, or the Blackness push for blackness and white scanning. The printer will start scanning.
-
If your original document or photo is loaded on the scanning surface (not the automated feeder), and you've selected PDF or Meaty PDF format, the printer will scan the original.
-
Then, a confirmation screen will display asking if you want to load another original to scan.
-
You can cull to load another original page or printing the left Function button when y'all are done.
-
-
When the scan is consummate, the scanned epitome(s) file will exist saved to your computer.

Default save location is Documents or My Documents folder depending on your Windows version.
-
Don't forget to remove the original from the platen glass scanning surface or from the document output slot.
Good to know
Program selection
The program selection screen may be displayed after pressing the Colour or Blackness button to start scanning. In well-nigh cases yous should select Catechism IJ Scan Utility, but you may opt to send the scanned images to My Prototype Garden (not available for Windows XP).
 Scan photos and documents with My Image Garden and also ingather, optimize and print your scanned images.
Browse settings
Sympathize scan setting options for your MX922 printer such every bit scan size, resolution, and data format.
Scan originals
-
Load originals for scanning correctly according to their type; otherwise, some originals may not be scanned properly.
-
You can scan photos, postcards, visiting cards, magazines, newspapers, documents, and BD/DVD/CD.
-
Some items can't be properly scanned, including:
-
A4 sized photos
-
Documents smaller than five inches x 7 inches (127 mm x 178 mm) such as a paperback with its backbone cut off
-
Originals on thin white paper
-
Long and narrow originals such equally panoramic photographs
-
Utilise WSD network protocol
If WSD is supported by your operating system, you can select enable it in the printer settings.
Get to Device settings > LAN settings > Other settings > WSD setting > Enable for WSD browse from this device.
When yous forwards the scanned data to the estimator searched using WSD, press the Color button to scan. In improver, yous won't be able to select the document type.
Related manufactures
Scan to a Macintosh® calculator - MX922
Scan to a USB stick - MX922

How To Scan From Canon Printer To Computer Windows 10,
Source: https://support.usa.canon.com/kb/index?page=content&id=ART142078
Posted by: connorsseent1983.blogspot.com
0 Response to "How To Scan From Canon Printer To Computer Windows 10"
Post a Comment