

How to manage network adapter settings on Windows 11
Although Windows 11 tin can observe and configure network adapters automatically, you may still demand to perform boosted steps to connect to a wireless network, enable specific features, review configurations, and troubleshoot issues.
In previous versions, you needed to apply Control Panel to manage various aspects of Wi-Fi and Ethernet adapters. However, on Windows xi, y'all can now configure almost of the networking settings and features from the "Network & internet" section. For case, you tin now enable or disable network adapters and configure DNS over HTTPS to meliorate security. It'south a lot easier to ready a static or dynamic IP address, configure data limits, reset the adapters to fix most problems, and more.
In this Windows xi guide, you will learn the different means to manage network adapter settings through the Settings app.
- How to enable or disable network adapter on Windows xi
- How to modify network profiles on Windows 11
- How to make network connexion metered on Windows 11
- How to manage known wireless networks on Windows xi
- How to connect to wireless network on Windows 11
- How to view wireless networks on Windows xi
- How to enable or disable wireless connection on Windows eleven
- How to configure DNS over HTTPS on Windows 11
- How to configure static IP accost on Windows xi
- How to configure dynamic IP address on Windows 11
- How to configure network data limits on Windows 11
- How to reset network adapter on Windows 11
- How to view network data usage on Windows 11
- How to view network adapter backdrop on Windows 11
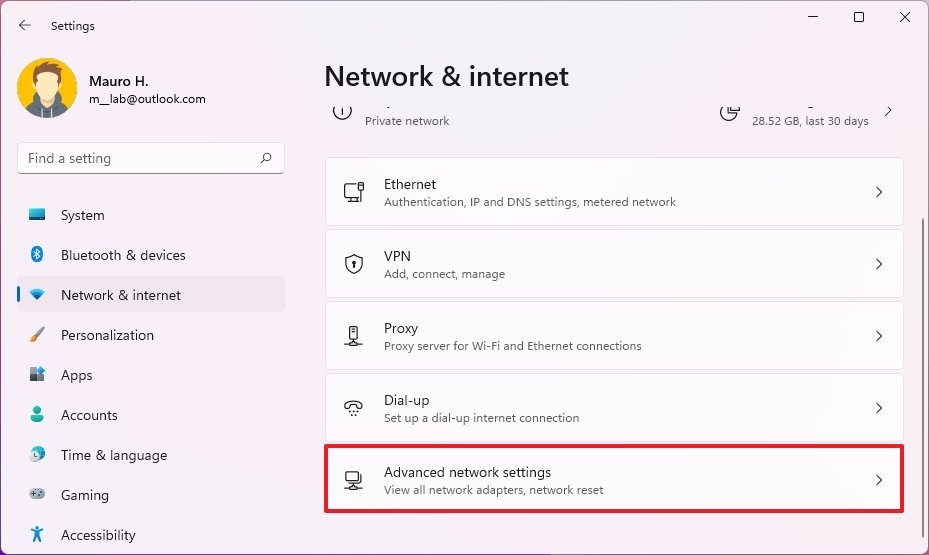
How to enable or disable network adapter on Windows 11
To enable or disable a network adapter, use these steps:
- Open Settings.
- Click on Network & internet.
-
Click the Avant-garde network settings page on the right side.
 Source: Windows Central
 -
Under the "Network adapters" department, click the Disable push to turn off the network adapter.
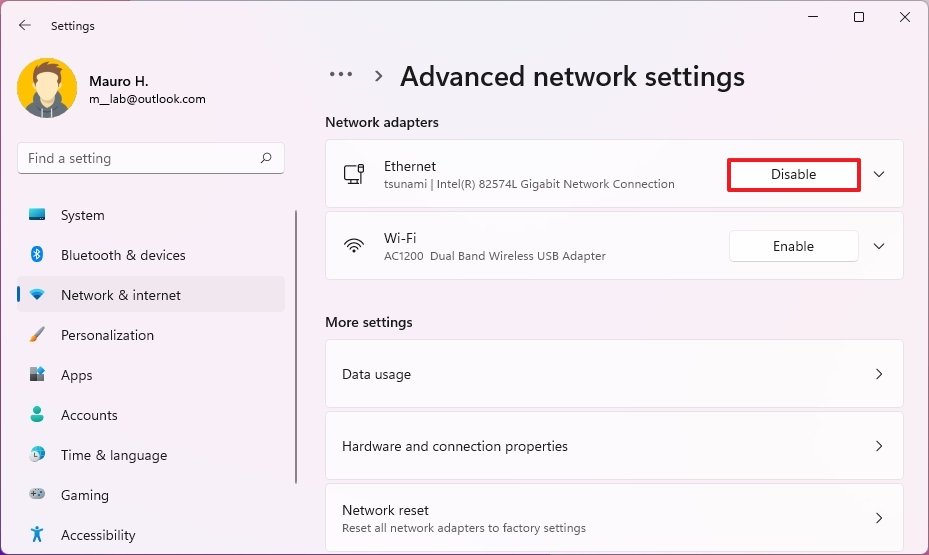 Source: Windows Central
 - Under the "Network adapters" section, click the Enable push button to plow on the network adapter.


In one case you complete the steps, the adapter will disable and no longer be available for the system. The adapter will once more be available to provide networking functionalities if you enable the option.
How to modify network profiles on Windows xi
On Windows eleven, changing the network profile blazon allows you lot to increase the networking security and make it easier to share files and other services with another computer in the network.
Ethernet connectedness
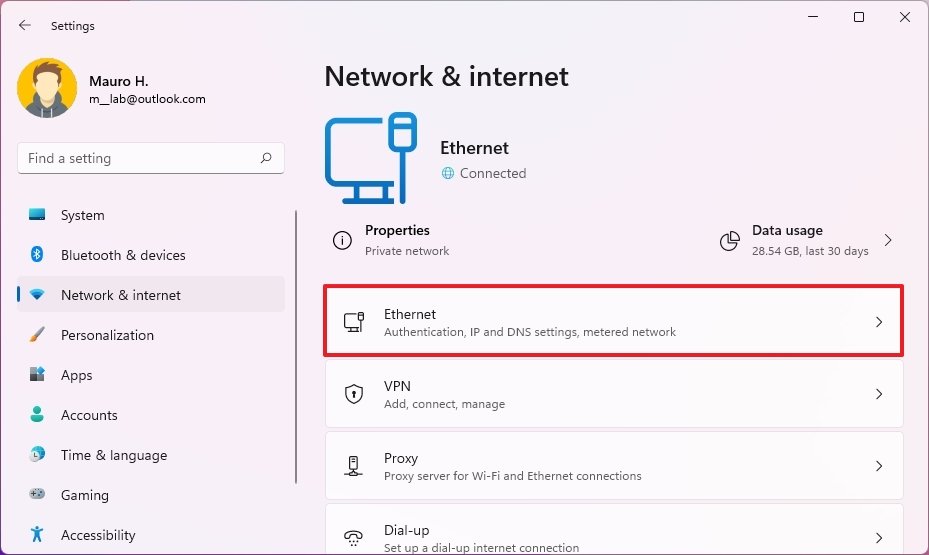
To make a network connexion public or private, utilise these steps:
- Open Settings.
- Click on Network & cyberspace.
-
Click the Ethernet page on the right side.
 Source: Windows Central
 -
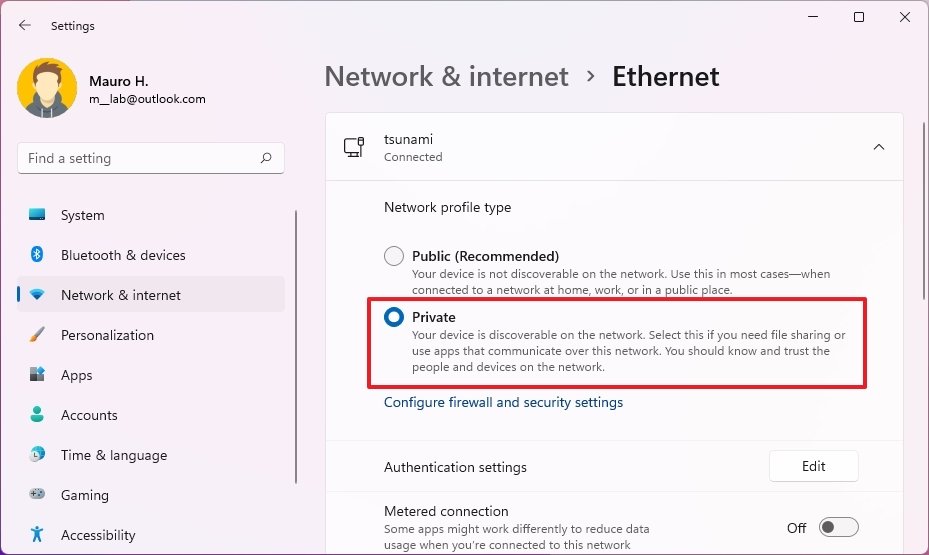
Under the "Network profile type" section, select the profile type:
- Public: Other computers in the network won't be able to run across your device. This is the recommended option for the home, office, and public places.
- Private: Other devices can see your computer in the network. When sharing files, printers, or using network applications, this option should exist considered.
 Source: Windows Central


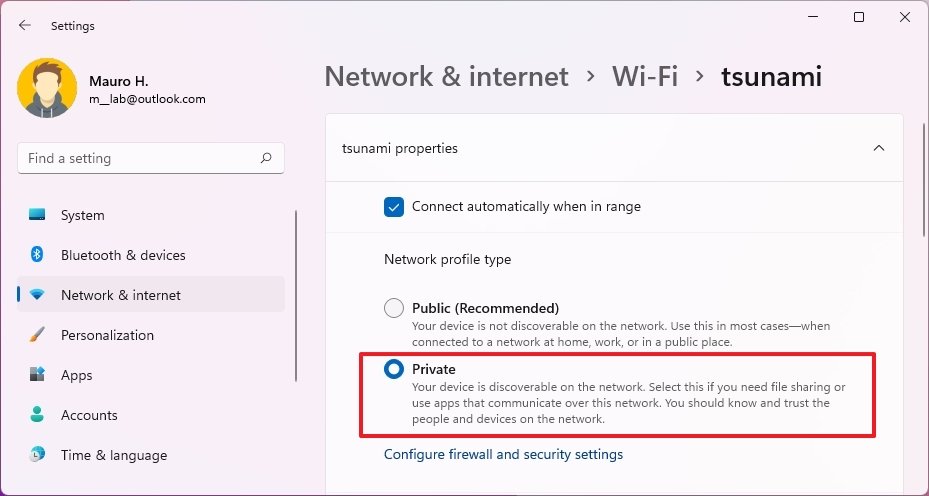
Wi-Fi connexion
To alter the network contour type for a Wi-Fi connexion, use these steps:
- Open up Settings.
- Click on Network & internet.
-
Click the Wi-Fi page on the right side.
 Source: Windows Central
 -
Click the connection properties setting.
 Source: Windows Key
 Quick note: The device must be already continued to the network to see the option.
-
Under the "Network profile type" department, select the profile blazon:
- Public: Other computers in the network won't be able to come across your device. This is the recommended option for the home, function, and public places.
- Individual: Other devices can come across your computer in the network. When sharing files, printers, or using network applications, this choice should be considered.
 Source: Windows Central


After you complete the steps, depending on the profile you selected, the device will non exist discoverable or exist visible by other devices to admission files and other services.
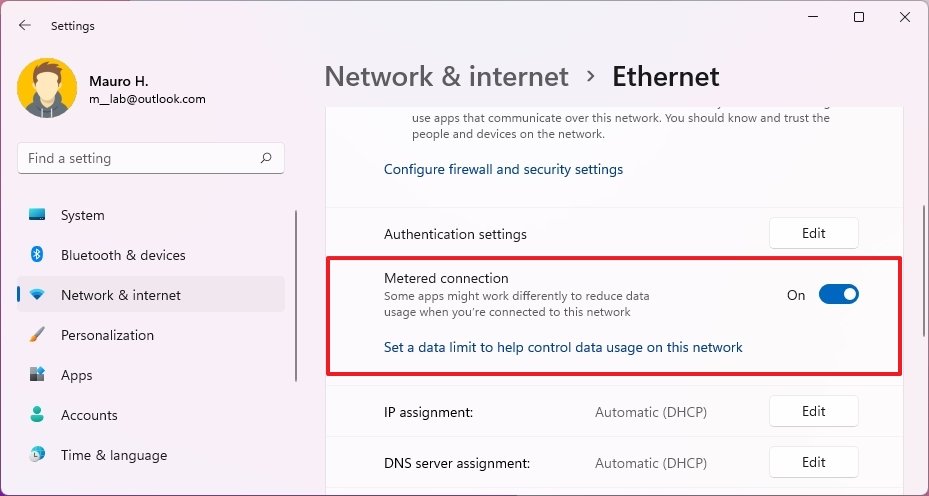
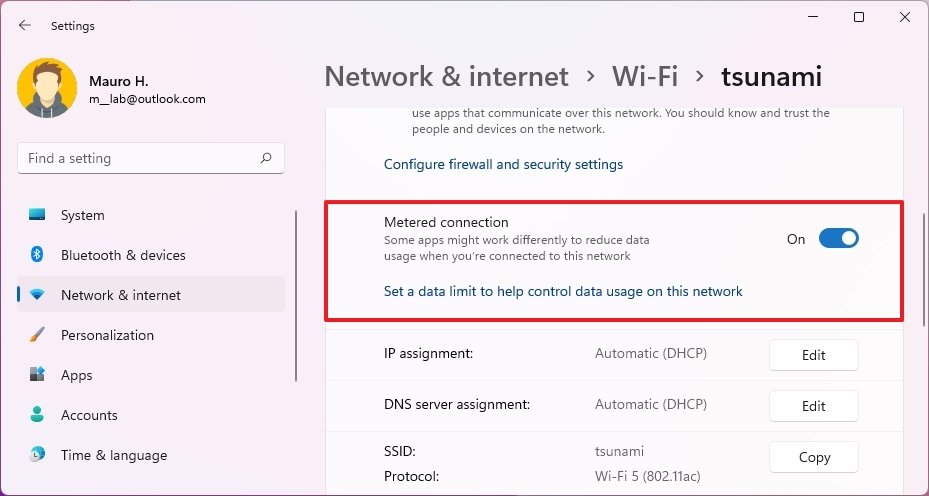
How to make network connexion metered on Windows xi
A metered connection reduces the background data usage of Windows 11 and apps to prevent going over a express data plan, such as on mobile hotspot plans that only offer a few gigabytes of information.
Ethernet connection
To make an Ethernet connection metered on Windows xi, use these steps:
- Open Settings.
- Click on Network & internet.
-
Click the Ethernet page on the right side.
Source: Windows Central -
Plow on the Metered connexion toggle switch.
 Source: Windows Primal

Wi-Fi connection
To make a Wi-Fi connectedness metered, utilise these steps:
- Open up Settings.
- Click on Network & internet.
-
Click the Wi-Fi page on the right side.
Source: Windows Central -
Click the connexion backdrop setting.
Source: Windows Central -
Turn on the Metered connectedness toggle switch.
 Source: Windows Central

Once you consummate the steps, Windows and apps volition utilize less data. For case, Windows 11 won't download cumulative or characteristic updates, and some features similar OneDrive won't sync files to the cloud, and apps won't download updates.
The settings volition only apply to the current connexion. If yous connect to a different network, y'all must reconfigure the feature as needed.
If you want to disable the characteristic, y'all tin can employ the aforementioned steps, simply on step 5, turn off the Metered connection option.
How to manage known wireless networks on Windows 11
On Windows 11, y'all can likewise provision Wi-Fi configurations to make connections easier. You lot tin also delete those connections you no longer use for better management.
Add new Wi-Fi network
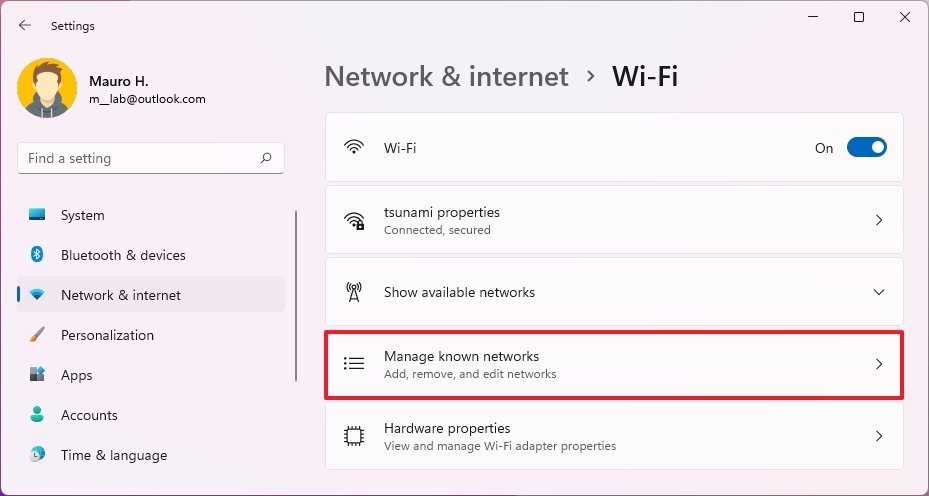
To provision a new wireless connection, apply these steps:
- Open Settings.
- Click on Network & internet.
-
Click the Wi-Fi page on the correct side.
Source: Windows Fundamental -
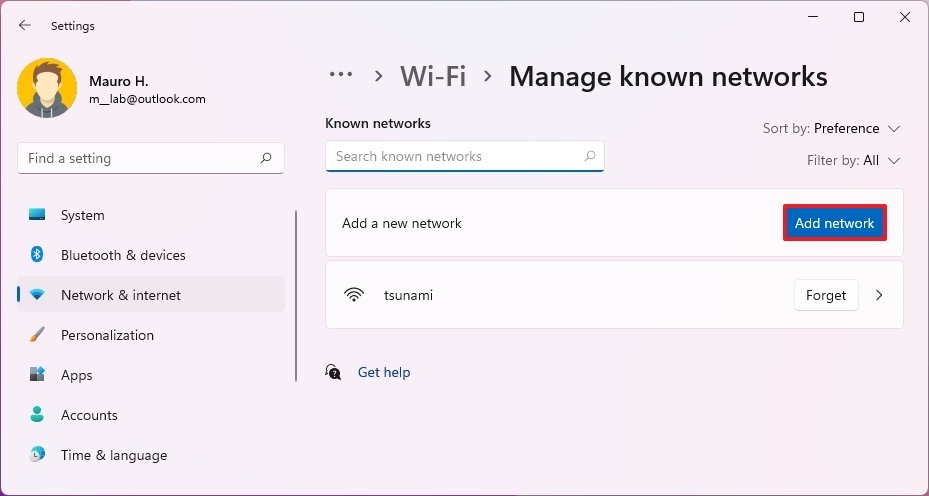
Click the Manage known networks setting.
 Source: Windows Central
 -
Click the Add network button.
 Source: Windows Fundamental
 - Ostend the wireless network proper name.
-
Use the "Security blazon" setting and select the security authentication method.
Quick notation: This security feature is unremarkably configured on the router or access bespeak. Typically, it would exist the WPA2-Personal AES option.
-
Use the Security key setting and confirm the security key (sometimes referred to equally "Wi-Fi password").
 Source: Windows Primal
 - (Optional) Check the Connect automatically option if you want to automatically connect to the wireless network when it is in range.
-
(Optional) Check the Connect even if this network is non broadcasting option.
Quick annotation: Unremarkably, you can choose the network to connect because it'south broadcasting its presence to all devices. However, sometimes, administrators choose non to broadcast the network to remain hidden. This option volition let you connect to the wireless network, whether information technology's broadcasting or not.
- Click the Save button.


After you consummate the steps, the network configuration will exist applied to the device, and when the access point is within range, the computer will connect automatically without additional steps:
Remove existing Wi-Fi network
To delete a Wi-Fi connectedness from Windows 11, use these steps:
- Open Settings.
- Click on Network & internet.
-
Click the Wi-Fi page on the right side.
Source: Windows Central -
Click the Manage known networks setting.
Source: Windows Central -
Click the Forget button for the network you desire to remove.
 Source: Windows Primal

One time you lot complete the steps, the network configuration will no longer be available on the device.
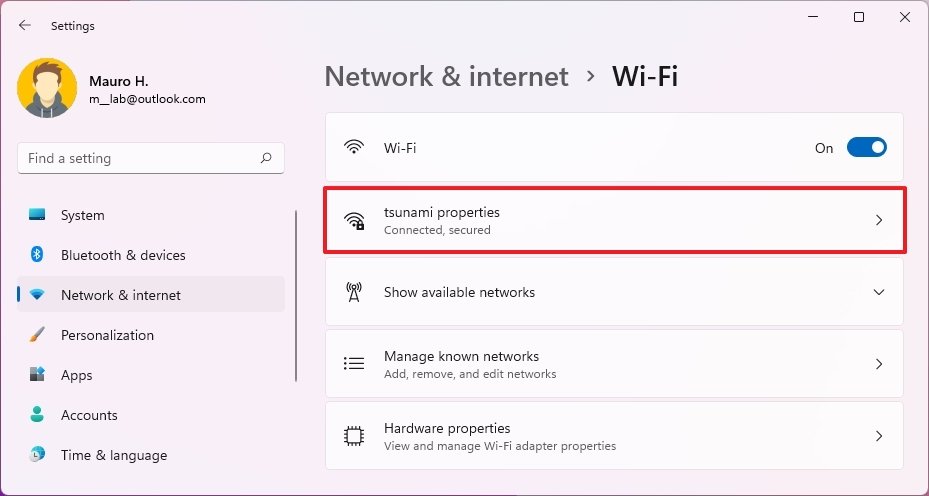
How to connect to wireless network on Windows xi
To connect a estimator to a wireless access point, use these steps:
- Open up Settings.
- Click on Network & internet.
-
Click the Wi-Fi page on the right side.
Source: Windows Central -
Click the Show bachelor networks setting.
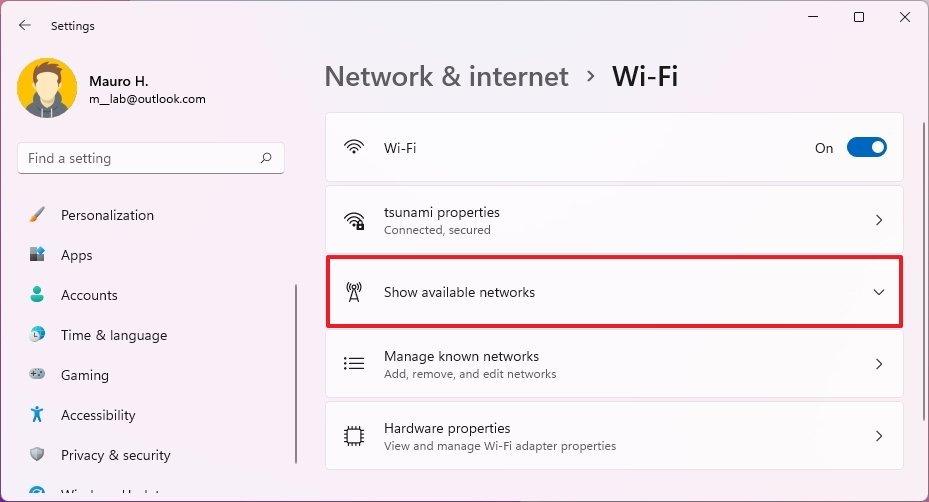 Source: Windows Central
 - Select the Wi-Fi network.
- (Optional) Check the Connect automatically option.
-
Click the Connect push button.
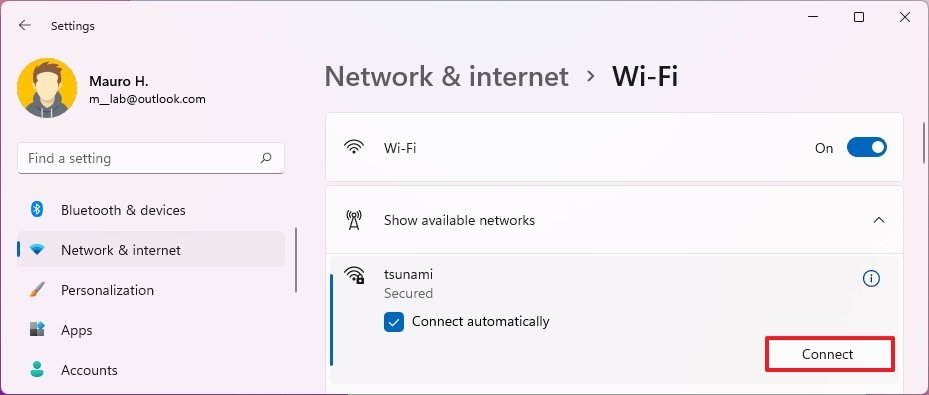 Source: Windows Primal
 - Confirm the security central (Wi-Fi password).
- Click the Side by side push button.


Alternatively, y'all tin besides connect to the wireless network through the network icon in the Taskbar.
How to view wireless networks on Windows eleven
To view the Wi-Fi networks in range, use these steps:
- Open Settings.
- Click on Network & internet.
-
Click the Wi-Fi page on the correct side.
Source: Windows Central -
Click the Prove available networks setting.
 Source: Windows Primal

Subsequently yous complete the steps, y'all volition see a list of the access points within range.
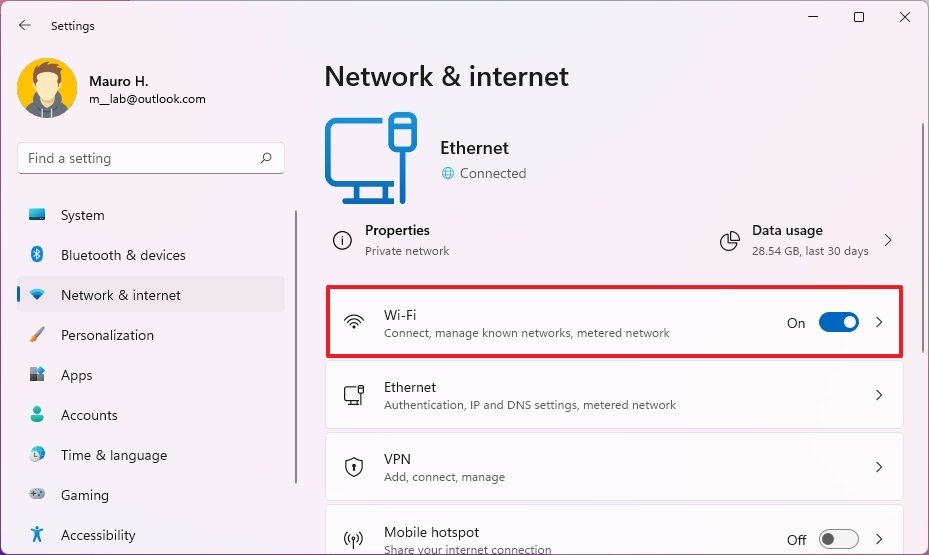
How to enable or disable wireless connexion on Windows xi
To disable or enable wireless connectivity on Windows 11, utilize these steps:
- Open up Settings.
- Click on Network & cyberspace.
-
Click the Wi-Fi page on the right side.
Source: Windows Central -
Turn off the Wi-Fi toggle switch.
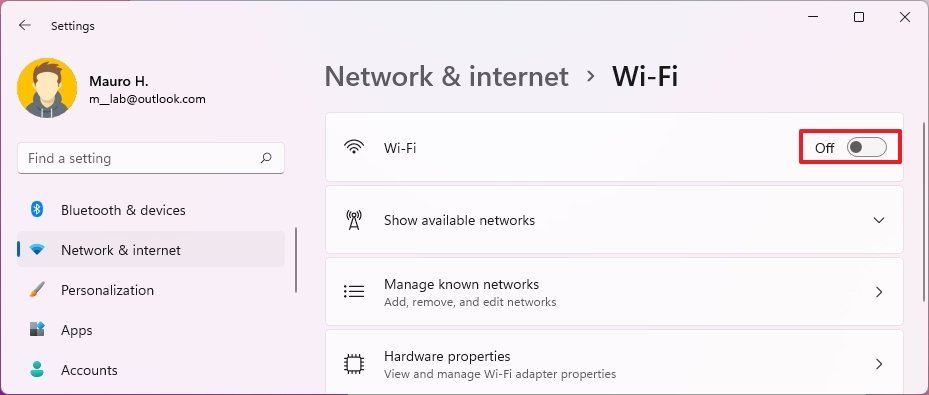 Source: Windows Cardinal
 - (Optional) Use the Turn Wi-Fi back on setting and select the Manually selection to keep the wireless off until you decide to turn it back on. Or use the times (i or 4 hours or 1 day) to let the system to reconnect automatically on schedule.

One time y'all complete the steps, the wireless radios will plough off and connections will not course, but the adapter will continue to be available in the adapter.
How to configure DNS over HTTPS on Windows 11
On Windows eleven, DNS over HTTPS (DoH) is a network protocol to encrypt Domain Proper name Organization (DNS) queries using the standard Hypertext Transfer Protocol Secure (HTTPS) protocol to safeguard DNS queries, which results in improved security and privacy browsing the web.
Ethernet connection with DOH
To enable DoH on Windows 11, utilize these steps:
- Open Settings.
- Click on Network & cyberspace.
-
Click the Ethernet page on the correct side.
Source: Windows Fundamental -
Click the Edit button for the "DNS server assignment" setting.
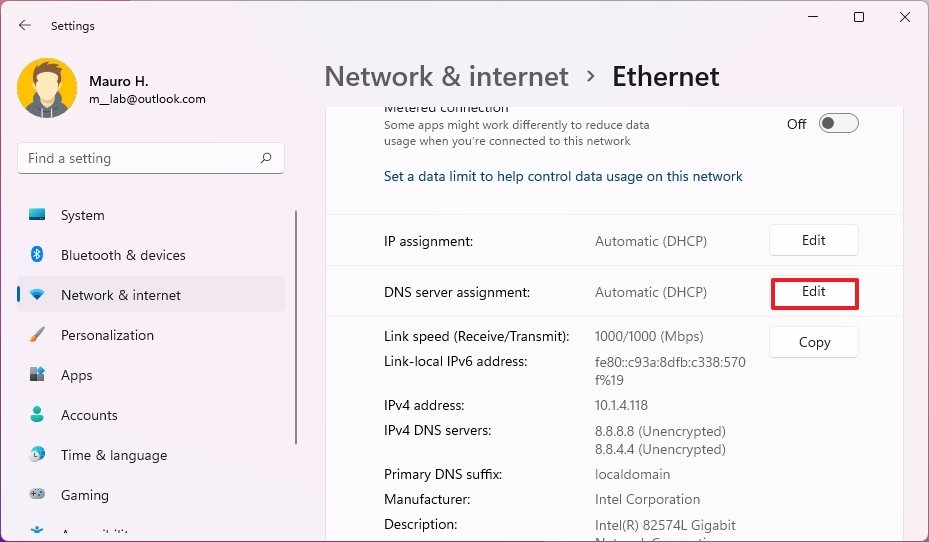 Source: Windows Central
 - Select the Manual pick.
- Turn on the IPv4 toggle switch.
- In the "Preferred DNS" setting, specify the IP accost of the server that supports DOH.
-
Use the "Preferred DNS encryption" setting and select i of the available options:
- Unencrypted merely: DNS traffic is transmitted without encryption as normal.
- Encrypted only (DNS over HTTPS): Windows 11 volition merely permit encrypted DNS queries.
- Encrypted preferred, unencrypted allowed: The system will prefer DNS traffic encryption, only it will also allow queries without encryption.
 Source: Windows Central
 Quick note: Since we are configuring DOH, you want to select the Encrypted only (DNS over HTTPS) option. You can learn more about this feature on this Microsoft back up website.
- (Optional) In the "Alternate DNS" setting, specify the IP accost of the secondary accost to use with DNS over HTTPS.
- Apply the "Alternate DNS encryption" setting and select i of the available options.
- (Optional) Turn on the IPv6 toggle switch.
- In the "Preferred DNS" setting, specify the IP version 6 address of the server offering DNS over HTTPS.
-
Use the "Preferred DNS encryption" setting and select i of the available options:
- Unencrypted merely.
- Encrypted only (DNS over HTTPS).
- Encrypted preferred, unencrypted allowed.
- (Optional) In the "Alternate DNS" setting, specify the IP version 6 address of the secondary address to use with DNS encryption.
- Apply the "Alternate DNS encryption" setting and select ane of the available options.
- Click the Salve option.


After you consummate the steps, the DNS queries will be sent encrypted over the internet.
Confirm DNS encryption
To confirm if the connectedness is encrypted, apply these steps:
- Open Settings.
- Click on Network & internet.
-
Click the Ethernet page on the correct side.
Source: Windows Cardinal -
In the IPv4 DNS servers property, y'all should at present see the new accost and the Encrypted condition.
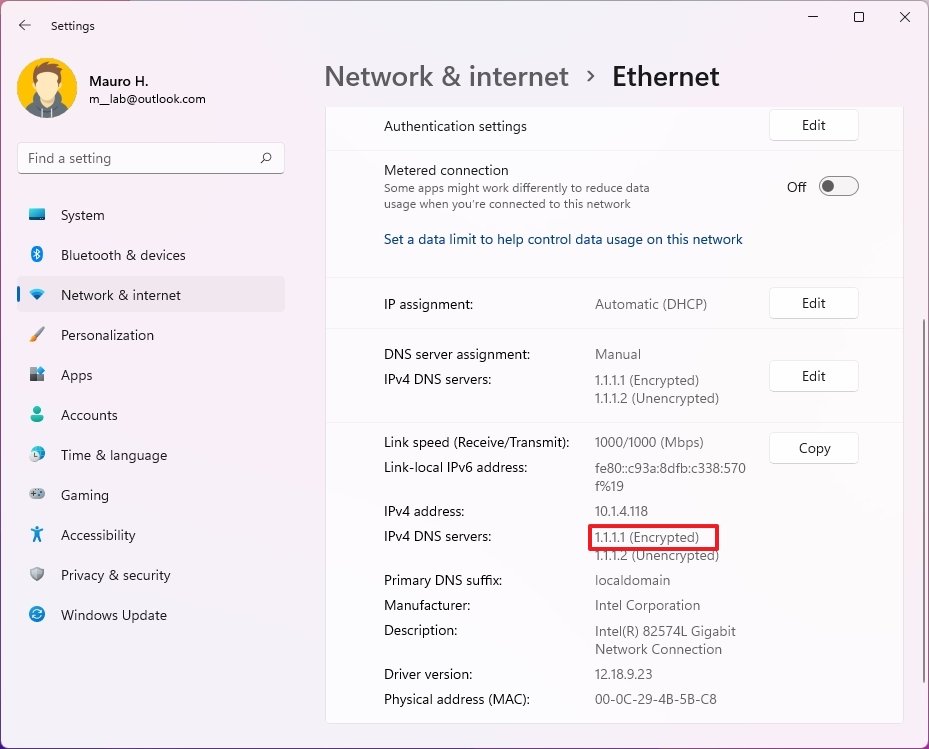 Source: Windows Central
 - In the IPv6 DNS servers property, y'all should at present meet the new address and the Encrypted status (if applicable).

One time y'all complete the steps, if you see the "Encrypted" status, DNS over HTTPS is working as expected.
Wi-Fi connectedness with DOH
To configure DOH for a wireless connection, utilise these steps:
- Open up Settings.
- Click on Network & internet.
-
Click the Wi-Fi page on the right side.
Source: Windows Key -
Click the Hardware properties setting.
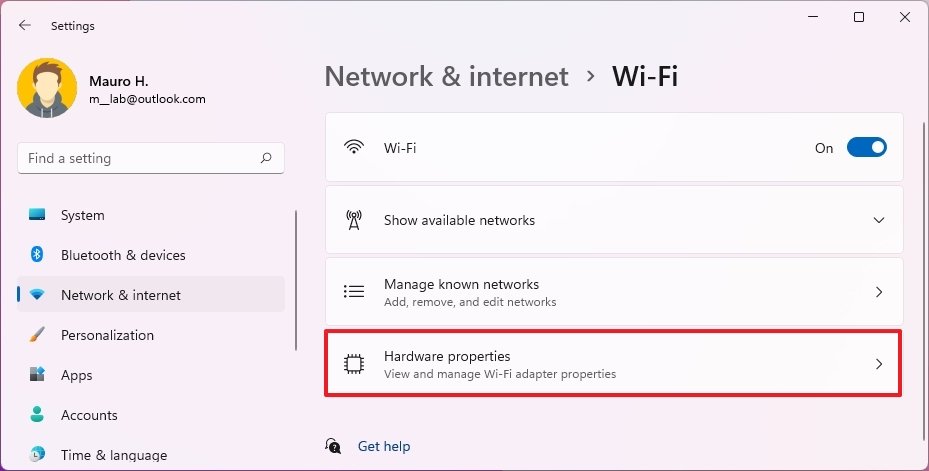 Source: Windows Central
 -
Click the Edit button for the "DNS server assignment" setting.
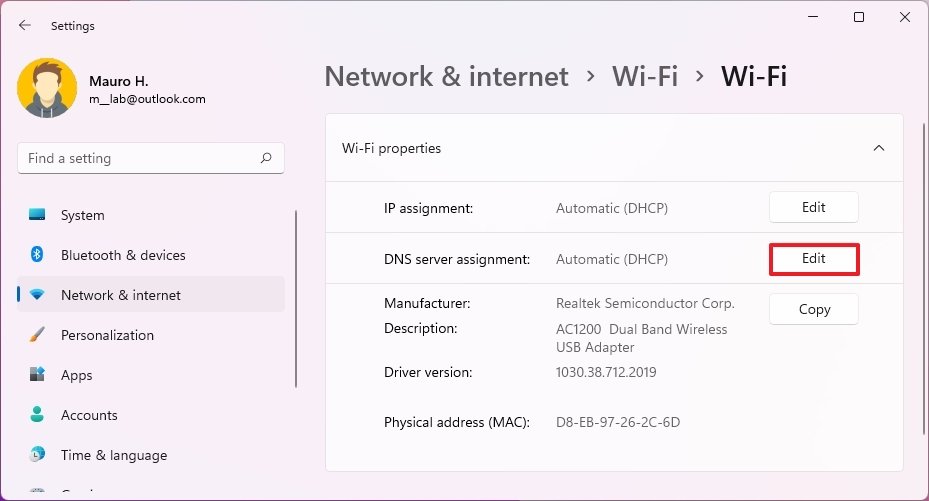 Source: Windows Key
 - Select the Transmission option.
- Turn on the IPv4 toggle switch.
- In the "Preferred DNS" setting, specify the IP address of the server that supports DOH.
-
Use the "Preferred DNS encryption" setting and select ane of the bachelor options:
- Unencrypted but: DNS traffic is transmitted without encryption equally normal.
- Encrypted only (DNS over HTTPS): Windows eleven will merely allow encrypted DNS queries.
- Encrypted preferred, unencrypted allowed: The system volition prefer DNS traffic encryption, merely it will too allow queries without encryption.
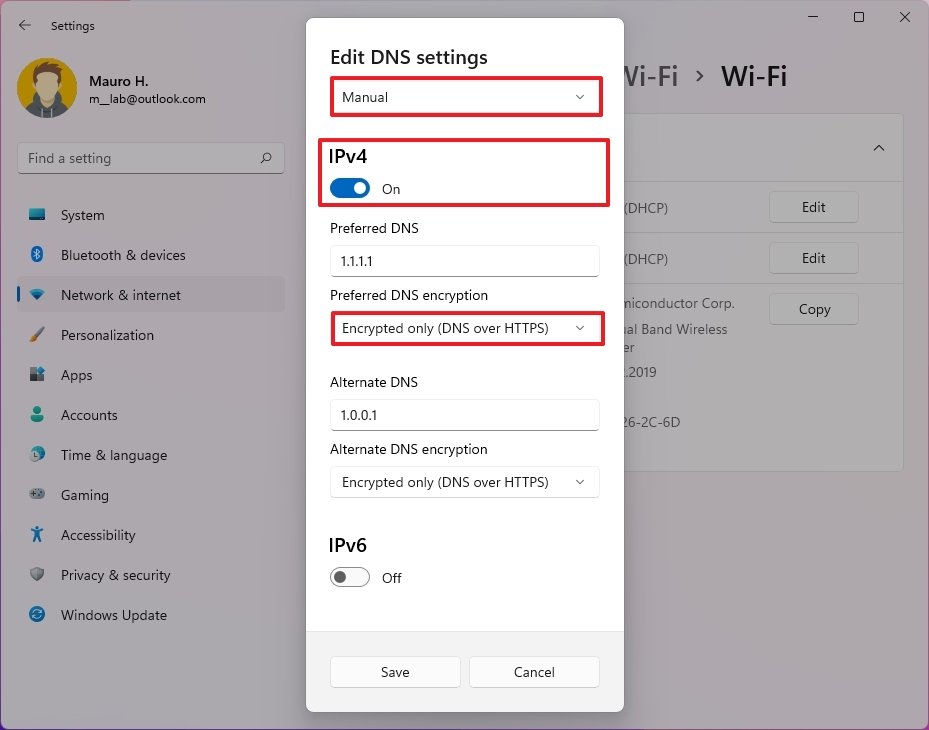 Source: Windows Primal
 Quick note: Since we are configuring DOH, you want to select the Encrypted merely (DNS over HTTPS) option.
- (Optional) In the "Alternate DNS" setting, specify the IP accost of the secondary address to employ with DNS over HTTPS.
- Apply the "Alternating DNS encryption" setting and select one of the available options.
- (Optional) Turn on the IPv6 toggle switch.
- In the "Preferred DNS" setting, specify the IP version 6 address of the server offering DNS over HTTPS.
-
Use the "Preferred DNS encryption" setting and select one of the available options:
- Unencrypted merely.
- Encrypted only (DNS over HTTPS).
- Encrypted preferred, unencrypted allowed.
- (Optional) In the "Alternate DNS" setting, specify the IP version half dozen address of the secondary accost to utilise with DNS encryption.
- Use the "Alternating DNS encryption" setting and select one of the bachelor options.
- Click the Save option.


After yous complete the steps, the wireless connection will transmit Domain Name System queries using the HTTPS protocol.
Ostend DNS encryption
- Open Settings.
- Click on Network & internet.
-
Click the Wi-Fi page on the right side.
Source: Windows Central -
Click the Hardware properties setting.
Source: Windows Central -
In the IPv4 DNS servers property, you should at present encounter the new address and the Encrypted status.
 Source: Windows Central
 - In the IPv6 DNS servers property, you should at present see the new address and the Encrypted status (if applicable).

Once yous complete the steps, if you lot run across the "Encrypted" label, then it means DoH is working on Windows 11.
How to configure static IP address on Windows 11
If yous have a calculator providing files, media content, and printers over the piece of work, it should exist using a static Transfer Control Protocol Internet Protocol (TCP/IP) configuration instead of a dynamic configuration.
The reason is that a dynamic network configuration assigned past the Dynamic Host Configuration Protocol (DHCP) server tin can e'er change. When they do, other devices in the network won't be able to access the network resources. On the other paw, a static IP configuration doesn't change, allowing the service to be ever reachable.
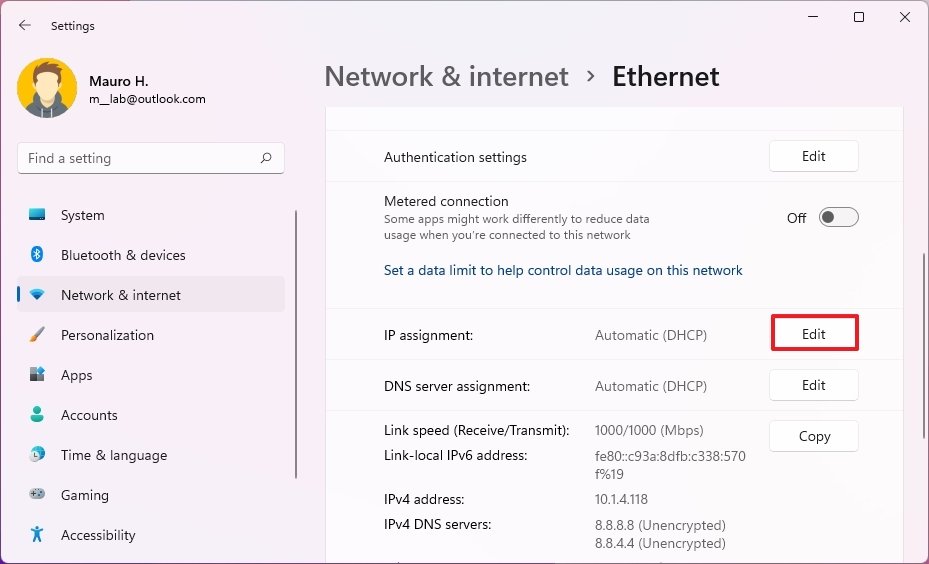
Ethernet static settings
To prepare a static IP accost configuration to an Ethernet adapter, use these steps:
- Open up Settings.
- Click on Network & internet.
-
Click the Ethernet page on the right side.
Source: Windows Primal -
Click the Edit button for the "IP assignment" setting.
 Source: Windows Key
 - Select the Manual choice.
- Plough on the IPv4 toggle switch.
-
In the "IP address" setting, specify the IP version 4 to assign the computer.
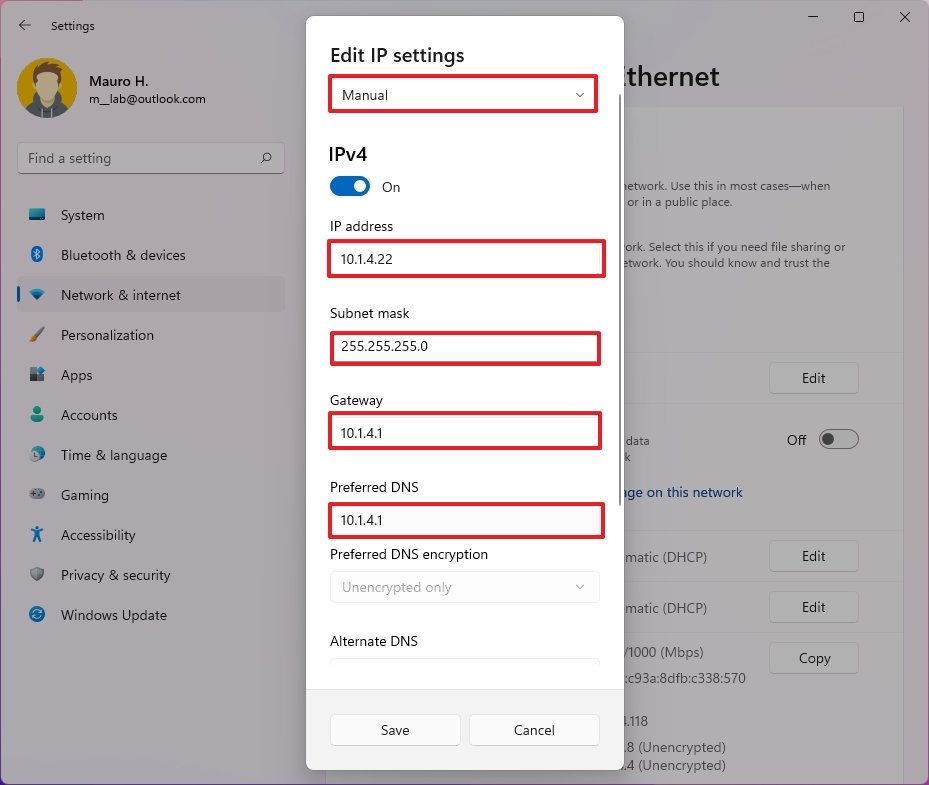 Source: Windows Central
 Quick tip: The IP address should be inside the network range, and information technology should be an address outside of the DHCP scope to avert possible conflicts. For instance, if the network is in the 10.ane.4.0 network and the DHCP assigns an address in the x.ane.iv.10 through 10.1.4.100 range, a suitable static accost could be 10.1.4.22.
-
In the "Subnet mask" setting, specify the network mask — for case, 255.255.255.0.
Quick note: If you are configuring the settings on a home or office network, the subnet mask is typically 255.255.255.0. However, it might be different if you are in a concern environment.
- In the "Gateway" setting, specify the gateway accost (usually the router accost) — for example, 10.1.iv.ane.
- In the "Preferred DNS" setting, specify the network DNS address (commonly the router address in dwelling and function networks) – for case, 10.ane.2.one.
- In the "Preferred DNS encryption" setting, select the Unencrypted simply selection.
- (Optional) In the "Alternate DNS" setting, specify a secondary DNS accost that volition be used in case the system tin can't discover the correct route with the primary address.
- In the "Alternate DNS encryption" setting, select the Unencrypted only option.
- Click the Save button.


Subsequently you consummate the steps, the computer will commencement using the new static network configuration.
Wi-Fi static settings
To configure a static TCP/IP configuration for a wireless adapter, employ these steps:
- Open up Settings.
- Click on Network & internet.
-
Click the Wi-Fi folio on the right side.
Source: Windows Central -
Click the Hardware properties setting.
Source: Windows Central -
Click the Edit button for the "IP consignment" setting.
 Source: Windows Fundamental
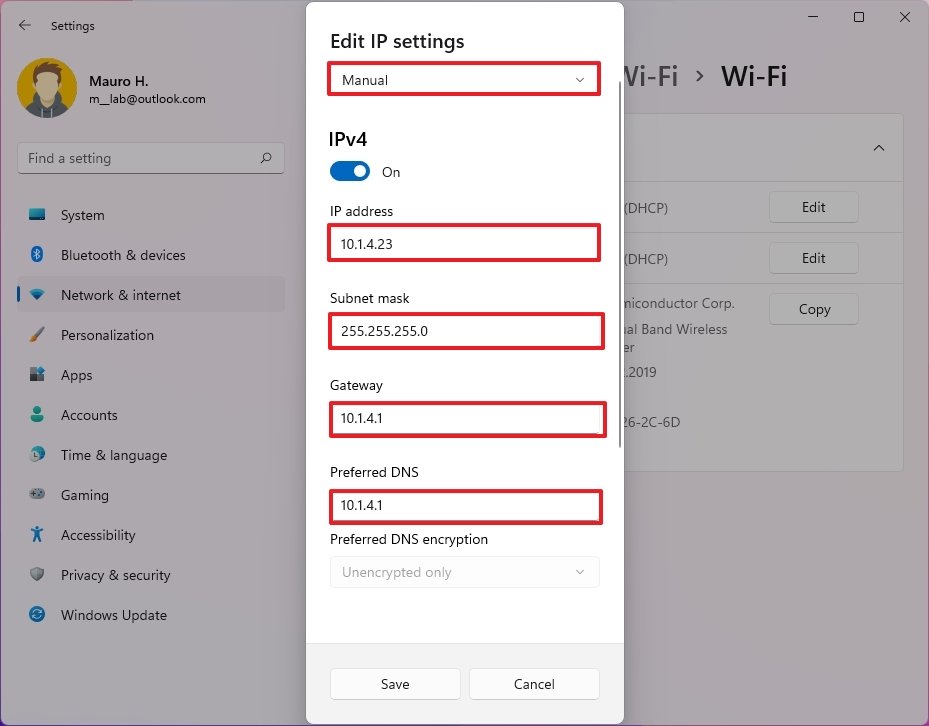
 - Select the Transmission choice.
- Turn on the IPv4 toggle switch.
-
In the "IP address" setting, specify the IP version four to assign the computer. For instance, ten.one.four.23.
 Source: Windows Cardinal
 - In the "Subnet mask" setting, specify the network mask — for example, 255.255.255.0.
- In the "Gateway" setting, specify the gateway address (usually the router address) — for example, 10.1.iv.1.
- In the "Preferred DNS" setting, specify the network DNS address (normally the router address in home and function networks) — for case, 10.1.four.1.
- In the "Preferred DNS encryption" setting, select the Unencrypted only option.
- (Optional) In the "Alternate DNS" setting, specify a secondary DNS address that volition exist used in case the system tin't notice the correct road with the primary address.
- In the "Alternate DNS encryption" setting, select the Unencrypted just option.


In one case you complete the steps, the wireless adapter will start using the new static IP address configuration.
We are focusing this guide on IP version 4, but y'all tin can too refer to these steps to fix an IP version 6 configuration if your network supports it. You simply demand to turn on the IPv6 selection on step 7 and provide the IPv6 addresses according to your network configuration.
How to configure dynamic IP accost on Windows 11
If you have a computer with a static IP accost, yous tin likewise change its configuration to allow the device to receive the network settings through the local Dynamic Host Configuration Protocol (DHCP) server.
Ethernet static settings
To change the IP address of an Ethernet adapter from static to dynamic, use these steps:
- Open Settings.
- Click on Network & internet.
-
Click the Ethernet page on the right side.
Source: Windows Cardinal -
Click the Edit button for the "IP assignment" setting.
Source: Windows Central -
Select the Automated (DHCP) option.
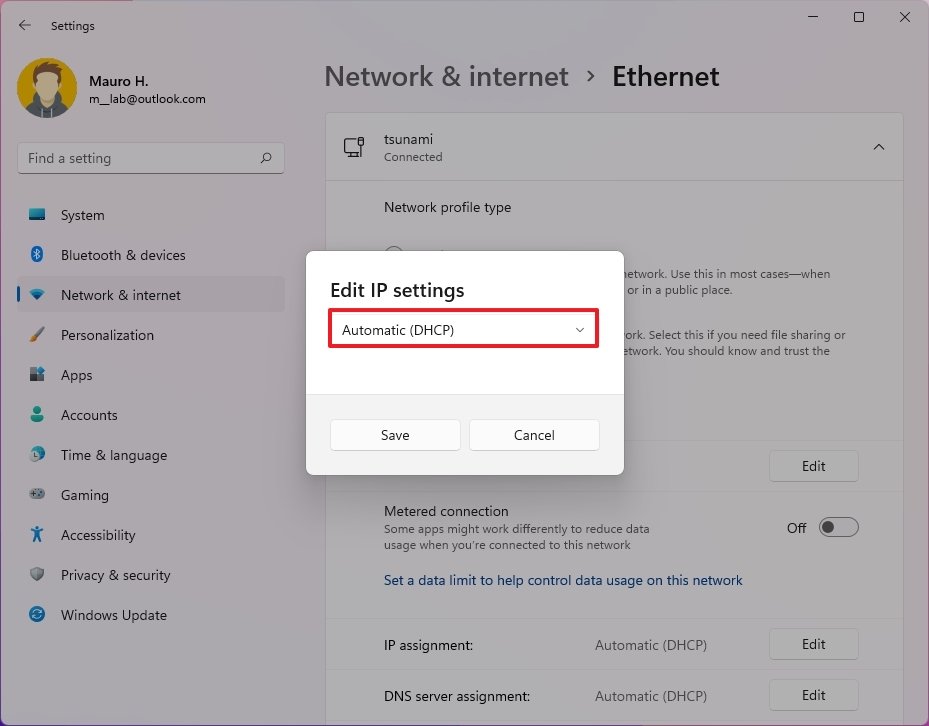 Source: Windows Central
 - Click the Salve button.

Wi-Fi static settings
To set a dynamic IP address for a wireless adapter, utilize these steps:
- Open Settings.
- Click on Network & net.
-
Click the Wi-Fi page on the correct side.
Source: Windows Cardinal -
Click the Hardware properties setting.
Source: Windows Key -
Click the Edit button for the "IP assignment" setting.
Source: Windows Central -
Select the Automatic (DHCP) option.
 Source: Windows Central
 - Click the Save button.

After you complete the steps, the Ethernet or Wi-Fi adapter will configure its IP address automatically through its Dynamic Host Configuration Protocol (DHCP) server.
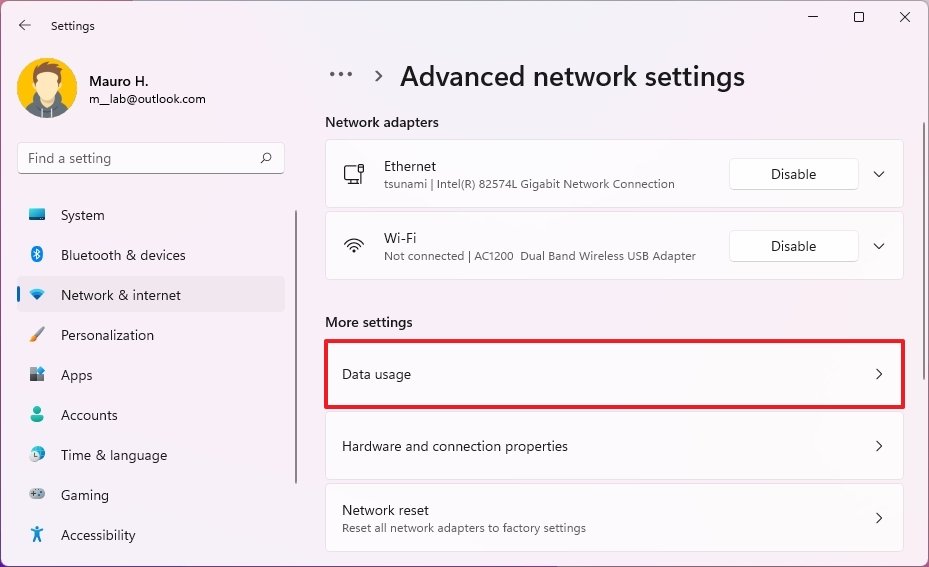
How to configure network information limits on Windows 11
Windows xi also comes with the ability to set data limits for a specific network adapter. Every bit you get closer to the limit, the organization will send yous a warning to aid yous stay under your information limit.
To configure information limit on Windows 11, use these steps:
- Open Settings.
- Click on Network & cyberspace.
-
Click the Advanced network settings page on the correct side.
Source: Windows Fundamental -
Under the "More settings" department, click the Information usage setting.
 Source: Windows Central
 -
Click the Enter limit button.
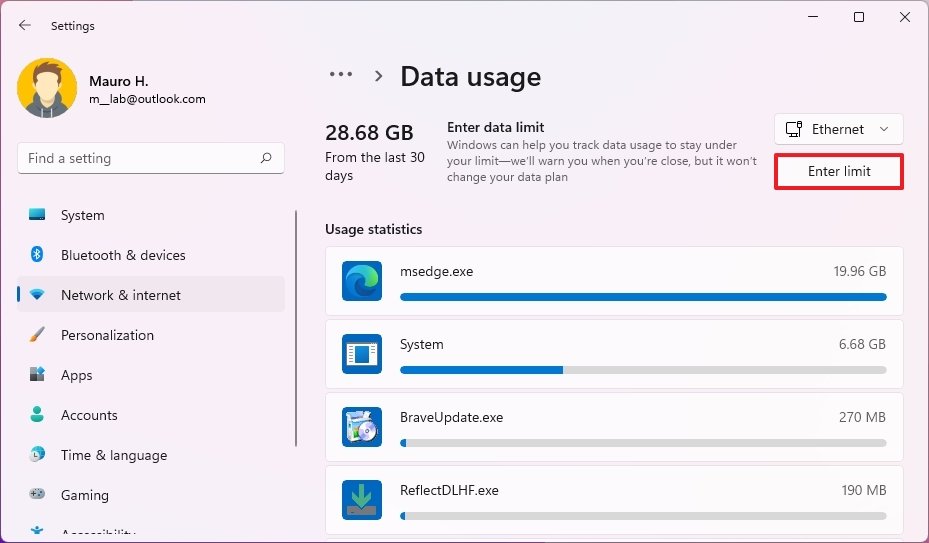 Source: Windows Central
 -
Select the limit type:
- Monthly.
- Ane fourth dimension.
- Unlimited.
-
Specify the monthly reset solar day or days until the data expires.
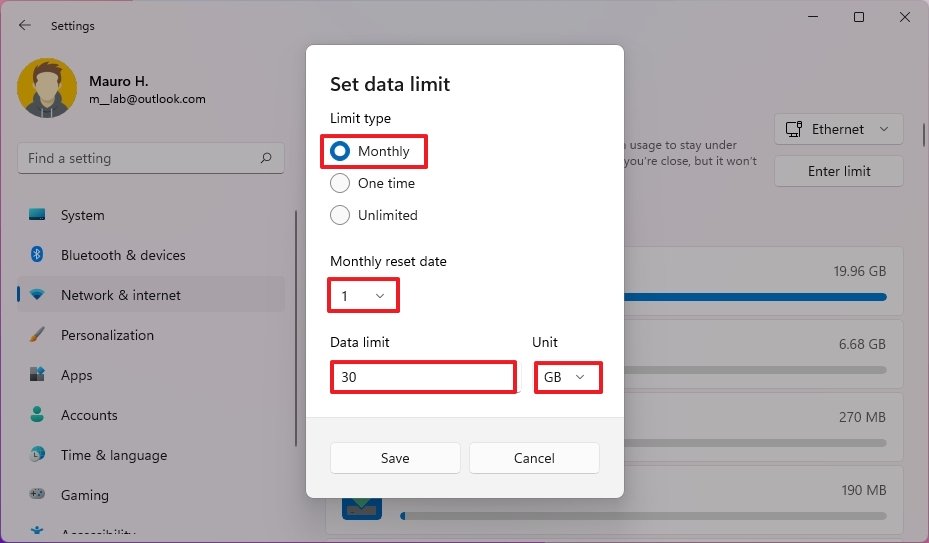 Source: Windows Central
 - In the "Data limit" setting, specify the data allowance.
- Confirm the data unit, including megabytes (MB) or gigabytes (GB).
- Click the Save button.


Once you lot complete the steps, Windows 11 will notify you when the limit is getting closer to assistance you stay under the data limit.
How to reset network adapter on Windows 11
When your laptop or desktop computer has connectivity bug, the reset characteristic will remove and install all the network adapters and reset all the configurations to their defaults to ready the well-nigh common problems.
To reset all the network adapter configurations, employ these steps:
- Open Settings.
- Click on Network & internet.
-
Click the Advanced network settings page on the right side.
Source: Windows Central -
Click the Network reset setting.
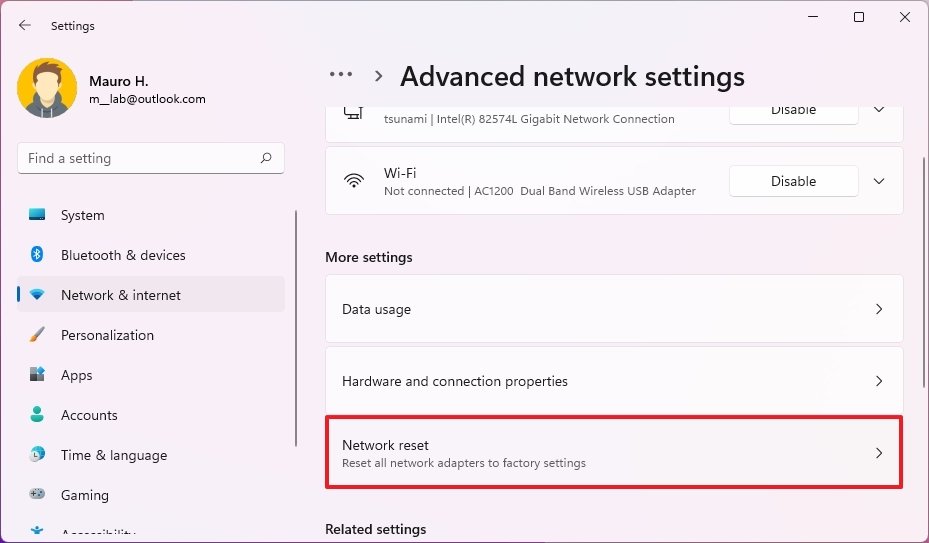 Source: Windows Cardinal
 -
Click the Reset at present button.
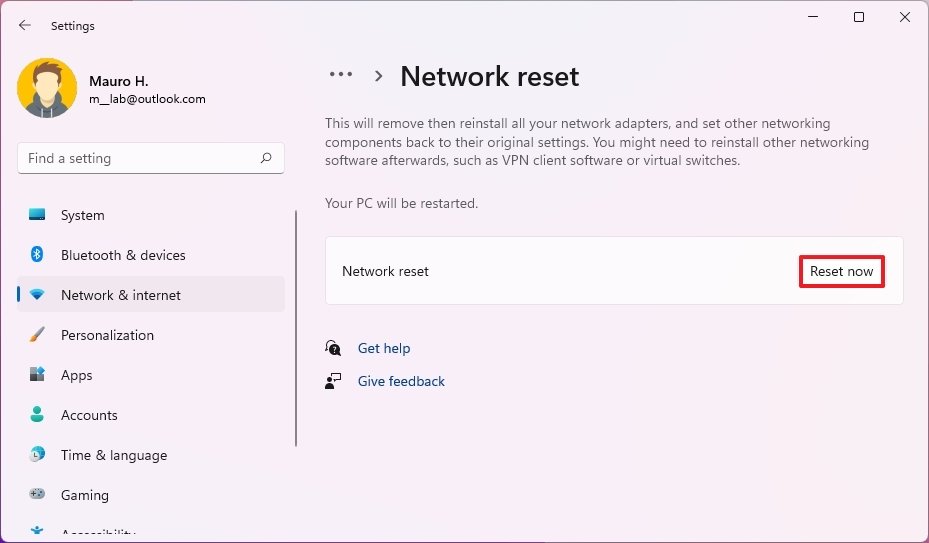 Source: Windows Central
 - Click the Yes button.


After y'all consummate the steps, the feature volition remove and reinstall all the network adapters and will reset all the network configurations to their defaults, hopefully fixing whatever Ethernet or Wi-Fi issues. If you lot likewise had a wireless connection, you lot may need to re-enter the authentication to connect to the network.
How to view network data usage on Windows 11
To view data usage per network adapter and apps on Windows xi, apply these steps:
- Open Settings.
- Click on Network & cyberspace.
-
Click the Avant-garde network settings page on the right side.
Source: Windows Key -
Nether the "More settings" section, click the Data usage setting.
Source: Windows Central -
Review the device data usage.
 Source: Windows Central

One time yous consummate the steps, yous will better understand the network data usage on your figurer.
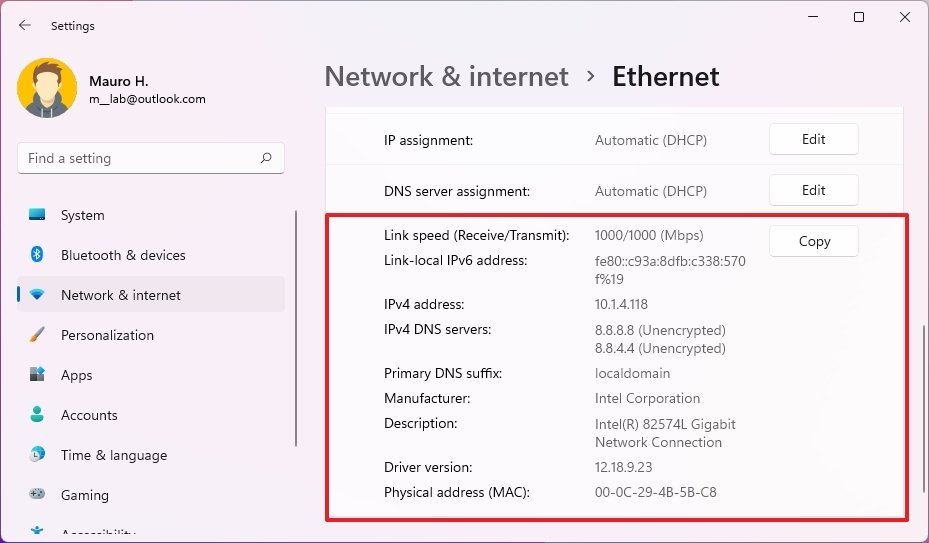
How to view network adapter backdrop on Windows xi
On Windows 11, you tin can find the network configuration information within the adapter's properties or through the Advanced network settings folio.
Ethernet properties
To find out the IP address and other network settings of the Ethernet adapter, use these steps:
- Open Settings.
- Click on Network & internet.
-
Click the Ethernet folio on the right side.
Source: Windows Fundamental -
Ostend the networking settings at the bottom of the folio.
 Source: Windows Primal

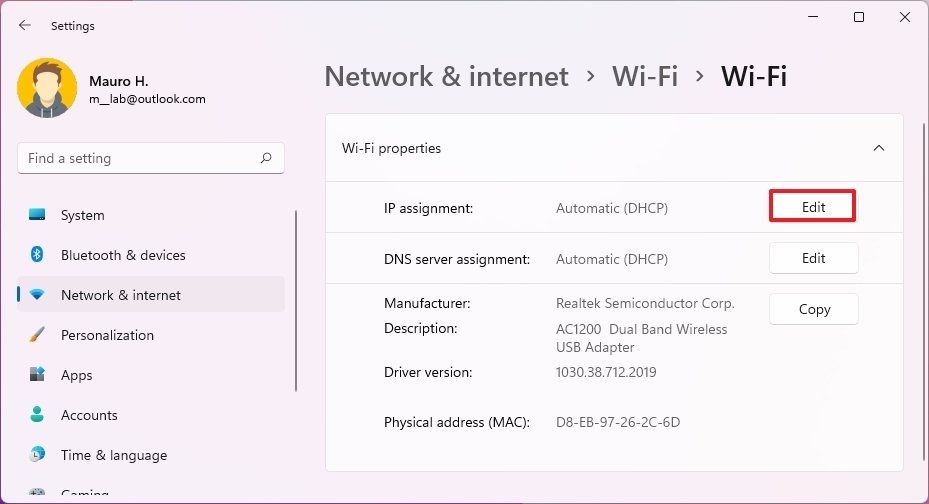
Wi-Fi properties
To determine the properties of the wireless adapter, apply these steps:
- Open up Settings.
- Click on Network & cyberspace.
-
Click the Wi-Fi page on the right side.
Source: Windows Cardinal -
Click the Hardware properties setting.
Source: Windows Central -
Ostend the networking settings at the lesser of the page.
 Source: Windows Central

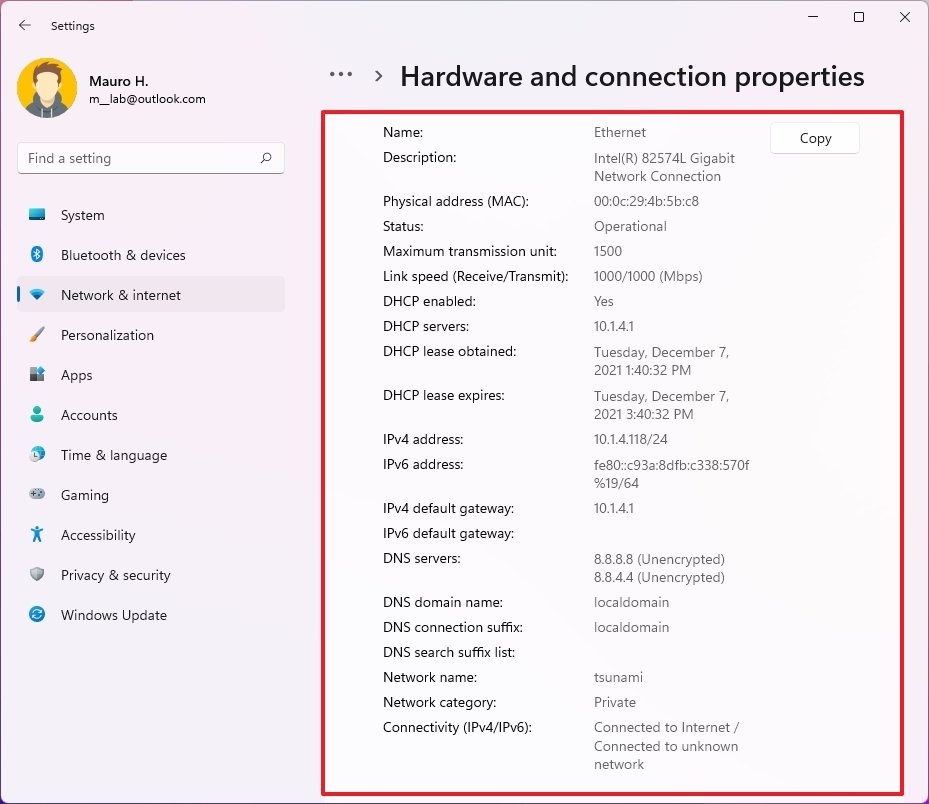
Ethernet and Wi-Fi properties
To view the network information for the adapters installed on Windows 11, employ steps:
- Open up Settings.
- Click on Network & internet.
-
Click the Advanced network settings page on the right side.
Source: Windows Central -
Click the Hardware and connection properties setting.
 Source: Windows Cardinal
 -
Confirm the networking settings at the bottom of the page.
 Source: Windows Central


Later y'all consummate the steps, yous volition exist able to determine many networking configurations, such as link speed, IPv4 and IPv6 addresses, DNS server, driver version and manufacturer, MAC address, and more.
More Windows resources
For more helpful manufactures, coverage, and answers to common questions about Windows x and Windows 11, visit the following resources:
- Windows 11 on Windows Key — All you need to know
- Windows 11 assist, tips, and tricks
- Windows 10 on Windows Central — All you need to know
We may earn a commission for purchases using our links. Learn more than.

Source: https://www.windowscentral.com/how-manage-network-adapter-settings-windows-11
Posted by: connorsseent1983.blogspot.com
0 Response to "How to manage network adapter settings on Windows 11"
Post a Comment