

How To Import Gpx File Into Strava App
GOTOES.ORG also makes great software for Mac OSX!
Add Time Stamps to FIT, TCX, or GPX Files
This need may arise if you're trying to import a course into your GPS or re-create and activity that you did in real life, but lost the GPS track for. You can also time-shift an existing activity. Don't use this tool to cheat - it leaves obvious signatures in the resulting file.Help With This
What does this tool do?
Sometimes, you need to add timestamps to GPS files. This need may arise if you're trying to import a course into your GPS or re-create and activity that you did in real life, but lost the GPS track for. In order to be accepted as a course, some GPS models need to have time stamps as part of the GPX file. Another possible reason is that if you want to use our Combine Tracks Tool; time stamps are required for that tool to work. We use the time stamps to put the files in order (the order in which they occurred). Another use for this tool is to time-shift an activity. This happens if the time of an activity is not recorded correctly and you want to shift the GPS time while keeping all the other values the same. Finally, you can use this tool to "recreate" an activity that was lost by your GPS. You enter the start date/time, and then the average speed, and a moving track will be created for you. Even though the speed won't be exactly accurate, you will at least get credit for the distance you rode. i do not recommend using this tool to cheat. The tool intentionnaly creates speed artifacts and signatures that will reveal cheating. The purpose of this tool is to repair rides so you can get the map and the mileage that you did when your GPS bugged out. If you try to take KOMs with this tool, it will be obvious to the trained eye, and you will be flagged.
It looks like you are getting a lot of use out of this tool!
I am glad that this tool is helping you out, and I hope you keep using it. Please consider making a donation to help keep me motivated to continue making updates and to help pay for the server. Every little bit counts. Also, if you cannot afford to donate, don't worry - I still aim to keep these apps free; thankfully, people who are able to donate have helped keep me inspired. (why should I donate?)
*(This tool uses cookies to remember if you already donated. Cookies are specific to this browser. If you have cookies turned off, deleted GOTOES cookies, or switch to another browser, you may get this nag screen again. To make it go away, just click the link you recieved when donating or subscribing via Patreon. Thanks so much for your donation!)
Connect With Strava
If you are having trouble uploading to Strava, please Reset Your Connection with Strava. We are migrating people to a more secure connection to Strava, so if you haven't used GOTOES tools since March 23, 2019, we recommend that you reset your connection and re-authorize GOTOES. Your old authorization will stop working October 2019.
- This browser has not yet been connected to the newest forms of Strava Tokens.
- You do not currently have an access token. This means you will need to connect with Strava.
*WARNING*
You should not check this box unless you really need it. This option slows the tool and may result in your file merge crashing if you have a lot of data/files. It is fine if you are doing a smaller merge.
Rarely Used Fields
There are some rarely used fields in SOME FIT files. For the most part, you do NOT need these fields. None of these fields are displayed in Strava - and they are only pertinent on websites such as Garmin Connect or Training Peaks. Moreover, they only contain data if you have additional sensors connected such as power meter pedals (that can record left/right balance) or running devices that measure vertical oscillation. If you check this box, you're going to slow down the processing of your data. If your FIT files are big, you may even crash your session.
Which Fields will be included?
Here are the fields that I have inserted so far. I'm still trying to figure out where Garmin puts the "performance condition" data, and "seated vs standing time" data:
accumulated_power, left_right_balance, vertical_oscillation, stance_time_percent, stance_time, left_torque_effectiveness, right_torque_effectiveness, left_pedal_smoothness, right_pedal_smoothness, fractional_cadence, left_pco, right_pco, left_power_phase, left_power_phase_peak, right_power_phase, right_power_phase_peak
Example of some of the fields that will be added (as seen in in Garmin Connect) 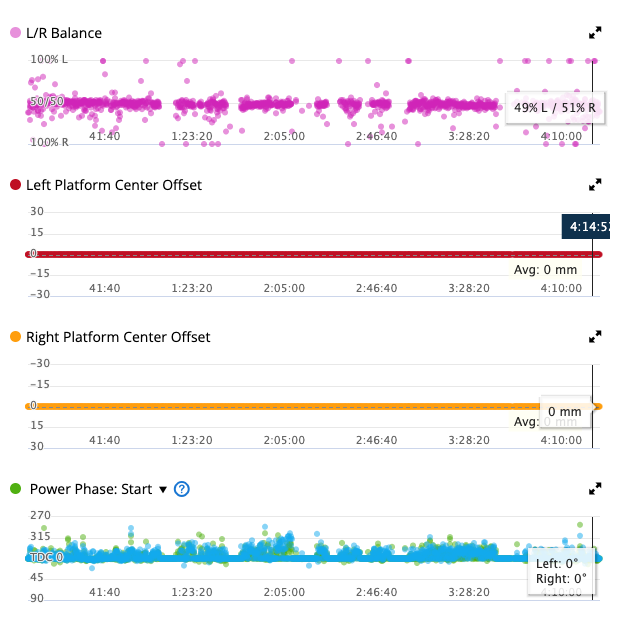
Raw Data
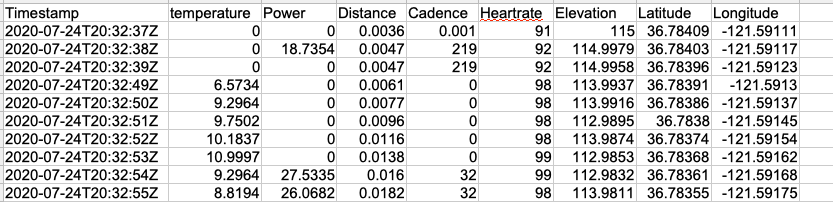
If you click the download raw data link, you will get a Tab-Delimited text file that can open in a spreadsheet program. This file contains all the points from your merged files, and all of the points are in order by time stamp. Order of headers is as follows:
time,lat,lon,elevation,cadence,heart rate,power,distance,temperature,lap
Add Connect IQ Fields to your Merged Export
What is Connect IQ?
Connect IQ fields are extra data fields that you can record on a Garmin Device. They ONLY show up in Garmin Connect, and cannot be seen in Strava. If you are only using Strava, please don't check this box.
Why is this box grayed out?
It is only possible to export ConnectIQ data inside of FIT files. Therefore, you need to select FIT as your Output File Format before this checkbox can be selected. If you don't know what ConnectIQ fields are, you should leave this box unchecked. Checking it will slow down processing of your file.
Why is it beta?
So far, only a few people have asked for this feature - and I have only received 2 files with ConnectIQ fields for testing. It is especially complicated to create a de-novo FIT file which has ConnectIQ data from more than one manufacturer. Each device or app gets its own ID, and each ID needs to be kept track of and re-represented precisely in the output file in order for it to show properly in Garmin Connect.
Calculated Speed
Use Distance or Use Speed
Because this tool is merging separate files, it needs to rebulid the index of accumulated distance. Historically, speed has simply been calculated by taking the distance divided by the amount of time to cover that distance. That calculation happens between each individual trackpoint. This works very well for almost all files - but certain devices such as rowing machines or pool swims do not record distance with fine granularity. Often, these devices will only increment the distance traveled every 100 meters. This produces a step-like graph for distance, and a staccato-like graph for speed. Fortunately, some of these devices DO record speed accurately. The default setting for this tool is "Use Distance" and I suggest you use that setting unless you are having issues with your speed graph. Otherwise, please try selecting "Use Speed." When you change the processing option, the page will reload. Also, remember that only TCX and FIT input files can have distance/speed embedded - so do not expect any changes to distance and speed if you are using GPX, CSV, or files directly transferred from Strava as your input files. If you are having trouble with smoothness of speed, maybe try the speed smothing option and/or "Interpolate Points" option in the next option field.
Speed Smoothing
This selection applies to your OUTPUT file. Historically, I have implemented a 10 trackpoint smoothing for speed. This means that the speed in the output file is actually the estimated average of the 10 seconds flanking that timestamp. This helps prevent staccato-like speeds in the final output file. Now you have control of how many points to smooth. If you move the slider all the way to the left, there is no smoothing, because the "rolling speed" only looks at one individual point. On the far right, the speed smoothing algorithm will look at the 20 flanking points. The default setting is in the middle, which is 10 flanking points for smoothing.
Editing Points
A practial use for this feature is a situation where your GPS recorded a spurious point. With Strava, you can do elevation corrections to fix all the elevation points, but what if you have one heart rate value that is too high? Now you can find it and change it. Also, if you have a latitude / longitude that is out in Timbuktu, now you can delete it or drag it into the proper position. I have written a Quick Tutorial to help you repair your corrupted GPS Tracks. (opens in a new window).
Inserting Missing GPS Tracks
Right now, this tool does NOT add new points - you can only move existing points. If you need to fill in a missing chunk of a ride, I have prepared a very detailed tutorial here. (opens in new window).
Please note that this window may take some time to load!
What is happening is that the tool is loading EVERY SINGLE data point so you can find any bad ones. Normally, browser based apps like Strava and Garmin Connect will smooth your data by only including every tenth point or so. This saves a lot of page load time because you are only transferring one tenth of the information. Because my tool is letting you have very granular control of your tracks, a longer page load time is necessary.
Smoothing Elevation
This field only applies when you interpolate your tracks.
A user approached me about files that he was uploading to the Rouvy Virtual Cycling App. This app connects to a trainer and resistance is based on the grade in the GPX file. The problem was that there were spurious points in the source GPX file (from a Garmin Edge 830), which caused the trainer to nearly lock up when the pitch of the climb suddenly increased momentarily. This should help you repair your GPS tracks so that they work better with Rouvy and other virtual ride apps.
There is a slider that controls how many points are used to average the elevation. If you leave the slider in the middle, it averages 10 GPS trackpoints. If you slide it all the way to the right, it averages 20 points. All the way to the left, it averages 1 point, which technically is no averaging at all! The slider will remember your last-used setting.
Why reduce points?
Merged Files can sometimes become huge files - sometimes they are even too big for Strava to process. I have found that ~30,000 track points is a safe limit when uploading FIT files to Strava. If the tool detects that you're trying to export as a FIT file, AND your file has more than 30,000 points, it will automatically select to reduce the number of points in the export. You can override this simply by changing the drop-down to not discard points (or discard fewer points)... but the tool may time-out during the merge process. This auto-reduction setting will help you avoid the time-out frustration.
Aerobic and Anaerobic Training Effect
This field is only abailable for FIT exports; it will be grayed out if you selected GPX or TCX in the "Output File Format" field.
How It Works:
Aerobic and Anaerobic training effect are both measures provided by Garmin to estimate how "impacting" a workout was for you. The scale is from 0 to 5 where a score of 5 is "Highly Impacting" and a score of 0 is "Not Impacting." It is only possible to embed this information in a FIT file - so if you choose GPX or TCX as your Output File Format at the top, these fields will be grayed out. If any of the FIT files you upload to the tool have information in these fields, these boxes will be pre-populated with the highest value from your files. Note that you can override the values if you see fit.
FTP Target Range
This field is only abailable for FIT exports; it will be grayed out if you selected GPX or TCX in the "Output File Format" field.
How It Works:
Garmin has a field in FIT activity files where you can embed a user's target FTP range. If any of the FIT files you upload to the tool have information in the FTP Target field, this box will be pre-populated with the highest FTP value from your files. Note that you can override the values if you see fit.
Normalized Power, Training Stress Score, and Intensity Factor
This field is only abailable for FIT exports; it will be grayed out if you selected GPX or TCX in the "Output File Format" field.
How It Works:
Normalized Power® (NP), Training Stress Score® (TSS), and Intensity Factor® (IF) are registered trademarks of Peaksware, LLC. (Training Peaks). These numbers have become the de-facto way to measure the intensity of cycling workouts with a power meter. If you are using the Training Peaks software and a power meter, you may want these values in your output file. Garmin Connect has also adopted using these values. If so, you will need to export from the tool in the FIT File format. If any of the FIT files you upload to the tool have data in these fields, these boxes will be pre-populated with the highest value from your files. Note that you can override the values if you see fit.
Why do you want me to donate?
I strongly believe in providing you with free tools to fix your Strava tracks. It provides me with great joy to be able to help people out.
Use of this tool has grown exponentially in the last several months. I started to notice that more and more people were getting "Out of Memory" errors due to the heavy usage. For a small website, processing over a million files a year is a big ask (especially if you consider that some of the activities people are uploading have millions of data points in each file). I don't want anyone to get those error codes (500 Server error) caused by an overloaded server! I decided to make some of the heavy-hitting features available to a small group of users (i.e. Donors...) so that the tool doesn't get overloaded. Every single Strava field (power, cadence, temperature, etc.) can be merged for free if you export as GPX. The donation-only features are mostly "convenience" features or features related to other tools such as Training Peaks or Garmin Connect.
If you really need help and cannot afford to donate, contact me and I can usually fix your GPS track for you.
**If you donated via Paypal before December 18, 2020, please use the contact link and write me with the PayPal email address you used to donate so I can send you a code for full-access to early-release features.
Time in Future:
You have a time stamp that is too far into the future. Sites like Strava will reject this file citing Corrupt Time Data.
How To Fix Option 1:
Try clicking on the "EDIT POINTS" button on this page. When you do that, you will see a map and a table with all of your points. Look for a bad point on the map and then use the trash can to delete it. If the map looks OK, check the time stamp for the first and last points of the activity. Trash any points that look wrong.
How To Fix Option 2:
Try exporting as GPX. GPX is more lenient than FIT or TCX when it comes to corrution. This is because some of the data is naturally omitted.
How To Fix Option 3:
If all of the time stamps are bad, you may want to use my Add Timestamps Tool and select the "Time Shift" to fix this file. You can just shift all of the points to the correct date and time by specifying the correct start time, and then checking the "Time Shift" box. This should repair your file. If you still have trouble, please contact me.
Inserting Serial Number:
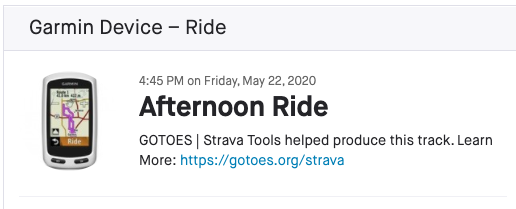
This field is only abailable for TCX and FIT exports; it will be grayed out if you selected GPX in the "Output File Format" field. It allows you to insert the serial number of your device into the final file. Why would you want to do that? If you are uploading to Garmin Connect, in order for some devices to be detected, there needs to be a serial number in the file. Having the serial number in the file does not matter for Strava. Here is an illustration of how things will look without (left) and with (right) the Serial Number embedded.
Inserting Software Version:
This field is only abailable for TCX and FIT exports; it will be grayed out if you selected GPX in the "Output File Format" field. It allows you to insert the Software Version of your device into the final file. It really only shows on Garmin Connect, and does not apply to Strava. Here is an illustration of how things will look without (left) and with (right) the Software version embedded. This is for the true recordkeepers.
Total Ascent:
This field will be grayed out unless you select FIT export. This early-access feature is only available to my Donation Supporters. **If you donated via Paypal before December 18, 2020, please use the contact link and write me with the PayPal email address you used to donate so I can send you a code for full-access to early-release features.
How it Works:
If you check this box, the total ascent from this Stream will be added to the total ascent from any other checked streams that you have checked. The total ascent in your final Strava upload will be the sum of all the Ascent Streams that you have checked. If you do not check any of the boxes, my tool will use the elevation profile to calculate a total ascent for your FIT files (GPX and TCX files, Strava will do the calculation). It is difficult to say what is most accurate - my tool's calc, Strava's calc, or the number reported by your device. The tool's calc and Strava's calc tend to be higher than the number reported by the device. To avoid surprises, you will probably want to check the ascent boxes. Another way to avoid surprises is to use the "Override Total Ascent" option down in the "Editing Data" field. Anything you enter in that field will take precedence over any other option.
Why is the Distance Stream Grayed Out?
Distance can only be embedded in TCX and FIT files, so if you have checked GPX export, that may be why. Also, if you have selected "Do Not Embed Distance" or "Calculate Distance" in the "Embedding Distance" options down below, this field will be grayed out. If this box is checked, you're using the distance that was embedded by your device. If you select the calculate distance option below, my tool ignores the distance stream in your file, and it re-calculates the distance by adding up the distance between every trackpoint.
Corrupt Time Stamps
If your file has corrupted time stamps, the merge might not work. It is OK to give it a try, but keep in mind, that your input file (and not my tool) may be the source of any downstream problems. My tool tries to rectify any time stamp issues by ignoring time stamps that are obviously not correct. Sometimes, that can effectively repair your FIT / TCX / GPX file and rescue it for upload. Sometimes, though, if the timestamps are very corrupted, my tool can't fix it. If you want, you can always use the contact form and ask me for help repairing your files. I have repaired many, but cannot guarantee that your files will be repairable.
Laps
Inserting Laps is a little tricky when you merge files. There are a couple of reasons why you might not get what you expect. One reason is if you are removing trackpoints (either if you choose to discard every X trackpoints, or if you select Remove Duplicates or Only With Position). If you select these options AND you select to include laps, you MIGHT lose some of your laps.
The number in parentheses is the number of laps in this particular stream.
Laps are going to work best when you are concatenating files (merging end-to-end). Laps may be problematic if you're trying to merge overlapping files (such as overlaying / interlacing heart rate data with position data). Give it a try and see if it works! Finally, I recommend that you only select laps from ONE stream if you have overlapping files. If you select laps from multiple streams, the distance / time of each lap may appear incorrect in your final file.
IMPORTANT
Laps can only be stored inside of TCX and FIT files. GPX files do not have anywhere to store that information, so this box will be grayed out if you have selected GPX export.
Insert Heart Rate into GPS File
A person using Strava did not want to buy a GPS tracker, and owns a "dumb" heart rate monitor. They do an activity in real life and know their average heart rate for an activity from the heart rate monitor. They will draw a route using Strava's Route Builder, then use my Add Timestamps to GPS Tracks Tool to add timestamps, making it as accurate as possible. They then will use this option here to insert the single heart rate value into the GPX track. The result will be a flat line heart rate, but it will help them keep track of effort. It is a rare use-case, so you will probably leave this field blank unless you're in a similar situation.
Override Total Distance
This field is only abailable for FIT exports; it will be grayed out if you selected GPX or TCX in the "Output File Format" field.
How It Works:
In order for this feature to work, you must select either "Calculate Distance" or "Use Existing Embedded Distance" in the "Embedding Distance" options above. If you select "Do Not Embed Distance", this will make Strava re-calculate your distance from the distance between points. The reason I cannot override un-embedded distance is because Strava ignores any total distance value I send them, and instead, they look at the distance specified between each and every point. Therefore, I cannot send just one single value, but instead I need to refactor the distance between every single point in your final file! The M and K buttons tell the tool if your entry is in miles (M) or kilometers (K). **Important Note: If not all of your files have a distance stream, I recommend that you use the "Calculate Distance" option instead of the "Use Embedded Distance." You may need to try both options to get what you want.
Best Practices:
If you decide to override the total distance, Select "Calculate Distance" ONLY if your file has trackpoints. The distance between each point will be calculated, but then my tool will apply an adjustment factor to each point to achieve your desired total distance. If none of your files have trackpoints (like if they were from an indoor workout), then you MUST select "Use Existing Embedded Distance". Without one of these two distances to key off of, the override feature will not work.
What is the gray number in this box?:
If you have uploaded a FIT file with an embedded total distance, my tool will read that number and put it in the streams at the top of the page. Then, the tool will sum up the values for all of the distance streams you have checked and put the result as a placeholder in this box. The purpose of the placeholder is to help you get an idea of the total distance that was in your original files; that is a starting place in case you need to massage the final output. Please do not use this feature to cheat. Remember: Cheaters only cheat themselves.
Override Total Ascent
This field is only abailable for FIT exports; it will be grayed out if you selected GPX or TCX in the "Output File Format" field.
How It Works:
If you enter a number in this field, that is what will show on your Strava feed for the activity. Don't cheat! Cheaters only cheat themselves. The M and F buttons tell the tool if your entry is in meters (M) or feet (F).
The light gray number in this field is just a placeholder; it shows the added up values of the Ascent streams that you have checked (basically, it does the math for you). If you don't enter anything, the tool will send Strava the total ascent from the boxes you have checked at the top in "Streams". If you enter any value in this field, then that will override any Ascent boxes you have checked in "Streams". Your elevation profile (graph) will not be affected - just the total ascent number.
Override Total Calories
This field is only abailable for FIT exports; it will be grayed out if you selected GPX or TCX in the "Output File Format" field.
How It Works:
If your device didn't calculate the correct number of calories, you can enter a number in this field, and that is the number of calories burned that will show on your Strava feed.
Uploading CSV File Rules
Delimeter
I have tried to make the CSV file upload as flexible as possible. Your CSV File can be either comma or tab delimted.
Column Headers
The first line of your file MUST have the column headers. They can be in any order. You MUST have one and only one header named "Timestamp". This is case-insensitive. The tool looks for partial matches, so "ele" or "elevation" or "alt" or "altitude" will all count for your elevation profile. Accepted types are Latitude, Longitude, Power, Cadence, Heart Rate, Temperature, Distance.
Table
Any Empty Values will be converted to zero.
Example of a valid CSV File:
Accepted File Types:
GPX:
This used to be the old standard for GPS, but it only can include Latitude, Longitude, and Elevation. Strava has a special non-standard format that allows one to embed Heart Rate, Temperature, Power, and Cadence. If you export GPX from this tool, it will use the Strava non-standard format which may not be accepted by some programs
TCX:
This is Garmin's early attempt at embedding additional data in a position (GPX) file. These files will include Latitude, Longitude, Elevation, Heart Rate, Power, and Cadence - but NOT Temperature.
FIT:
These Files contain every bit of data you can imagine tracking. At this time, the tool ONLY reads in Latitude, Longitude, Elevation, Heart Rate, Calories, Power, Cadence and a few other supporting variables. Also, on the next page, you can choose to import "Developer Data", which are the Garmin ConnectIQ fields present in some files. The reason I don't import all of the data is that some people try to upload 20+ activities at a time, and if you import all of that data at once, the tool can crash.
CSV:
You can import CSV files - but they need to be carefully formatted! The first row must contain the column headers. There must be one and only one "Timestamp" header. Your CSV can be comma or tab delimited. For more info on proper CSV format, click here
ZIP:
Any of the above formats can be placed in a ZIP file to save yourself upload time. For more info on how to make your ZIP files, click here.
DIRECT FROM STRAVA:
This early-access feature is currently only for my Donation Supporters. **If you donated via Paypal before December 18, 2020, please use the contact link and write me with the PayPal email address you used to donate so I can send you a code for full-access to early-release features. Please let me know if you encounter any issues with uploads directly from Strava. You can mix-and-match meaning that you could select one file from your Strava by checking a box - and merge it with a file uploaded from your desktop computer. Because this feature is new, I need to know if you encounter any issues! If, instead, you want to Merge GPS files from your Garmin Connect Account, Click Here.
SAFARI ISSUES
How to work-around Safari 14.0.2 being broken. As of November, 2020, Apple has broke the "Choose File" button... for some people using Safari 14.0.1 browsers. I have rewritten the button code to try and work-around this bug, which I suspect they will fix soon. If you do decide to add more "Choose File" buttons by clicking the link for iOS buttons, please make sure that you at least select a file with the first (top) button. If no file is selected with that button, you will get an error
Time Zone
Setting the time zone is important for visualizing your files in my tool. Setting it correctly will make the time bars on the 2nd (upload) page have the correct start and stop times. If your file has GPS coordinates (longitude and latitude), then you can simply select "Let Tool Guess My Time Zone" (that option is at the top of this drop down). The tool will remember your previous time zone in a cookie so the next time you use the tool, it will automatically select the correct time zone for you. That works great - unless you do activities that start in different time zones. In that case, you will have to re-select the time zone, or tell the tool to select the time zone for you.
Indoor Workouts / Trainer / Turbo Rides / Pool Swims
These types of activities do not contain GPS information, so you MUST select the correct time zone - the tool cannot figure it out for you. When you upload an indoor workout to Strava, Strava will use the location set in your profile to determine the time zone. The GPS files all use a time called UTC - which is the time at the Prime Meridian (remember that from gradeschool?). If your indoor workout time is wrong, make sure you have selected the correct time zone here
Uploading Bigger Files:
To save yourself upload time - and to bypass the size limits, you can ZIP compress your files before uploading. **IF THIS DOESN'T WORK, PLEASE CONTACT ME AND I WILL HELP YOU - EVEN WITH EXTRA BIG FILES.
On a Mac:
Highlight all of the files that you want to upload (to highlight multiple files, use the shift key while selecting, or use the command key and click on individual files). Once the files are selected, click with your right mouse button and select the option that says "compress." A new file that looks like it has a zipper on it will appear in the same location, and you can upload that to my tool. This file can contain FIT, TCX, or GPX files.
On a PC:
Right-click the file you want to zip, and then select Send to > Compressed (zipped) folder
**Important:
Do not put the items in a folder, and then compress the folder. If you do that, my tool will not be able to see your files.
Not Enough Point Density
I strongly encourage you to check the 'Interpolate Track' checkbox for this merge. This is because the tool has detected that your track-points are too far apart to create a smooth map/activity. This can happen if you are trying to add time-stamps to a route file... but the point density was not high enough.
I have more discussion on this topic on The Help Forum
If you leave this box checked, you give permission for my tool to put a link in your activity description back to this page. Also, as a bonus, if you leave this checked, you won't get a constant reminder to donate!
I find that many people are not aware that they can repair their tracks. Even some people in my feed will post two truncated activities with a title like "Garmin Fail!#$@%$!" By getting the word out that this tool exists, more people can repair their tracks and we can have cleaner, less cluttered Strava feeds. If you uncheck the box, the tool will remember your preference in that browser. This is what the link will look like in your feed:
Interpolating Tracks
To interpolate means you will be adding in points between the existing points. I do not recommend you select this option unless Strava is mis-reporting your average speed or elapsed time. The reason I do not recommend this option for all files is because it will make the file much larger - it will create a file with one trackpoint every second. The most common use for this option is if you were using the Add Timestamp tool and the source track you were using did not have a high enough trackpoint density. Most devices record a trackpoint every second up to one trackpoint every 5 seconds. If there is a large gap in time between trackpoints, Strava will consider that to be stopped time - and it will mess up your average speed as well as the graphs related to pace. Another application could be for a swimming activity - if you are trying to achieve a swim moving time that equals your swim elapsed time. Otherwise, if you're using a real device in a real world situation, then this option isn't necessary.
When you check the box, the screen will display a progress bar as it interpolates your track points. After it is done, you should get a message showing how many points you have now. If interpolation is successful, then the checkbox will be grayed out. This is because the tool cannot un-interpolate your files. If you need to reset the interpolation, please refresh the entire page.
Just leave this optional field blank if you do not want to make any changes.
Discarding Heart Rate
Sometimes your heart rate monitor can record bad values. This can happen at the beginning of a ride (because the interface between your chest and the heart rate strap is dry and not moistened with sweat). It also happens more often on downhills because the wind can cause your jersey to flap quickly creating static electricity that interferes with the strap. Another cause can be wearing a jacket or vest over a jersey that causes static electricity. It happens more often on dry days than on humid days. Occasionally, some types of heart rate straps can also be influenced by nearby high voltage power lines. Knowing this may help you prevent bad data in the future. Using this tool, you can set a maximum value - and anything above that value will be discarded. In its place, the last known "good" value will be substituted. For example, if your max heart rate is 180, enter that value and if you are flying downhill and your monitor records a heart rate of 255, then the tool will eliminate all of those bad values. Your browser will remember your previous settings so you do not need to enter this every time.
Just leave this optional field blank if you do not want to make any changes.
Discarding Power
Power meters can sometimes spike and ruin your power curve. Use this feature to eliminate bad data that you know is impossible for you. Spiked data will either be converted to last known good value or to zero. Your browser will remember your previous settings so you do not need to enter this every time.
Adjusting Power
This number is entered as a percent. Range is from negative 100 percent to positive 100 percent (double). There are three use-cases that I can think of:
Double The Power
If you have a left-only power meter and for some reason it is not doubling your power, enter 100% in this box to double your power.
Left only power meter
This can come in handy if you are using a left only power meter and you know that your left side is x% stronger (or weaker) than your right side.
Switching Power Meter Pedals between bikes with different crank lengths
If you have one pair of power pedals, and do not want to constantly change the crank length in your Garmin (and re-calibrate), you can just enter a fixed number in your Device. Let's say your MTB has 175mm cranks and your road bike has 170mm cranks. Tell your device that your cranks are 170mm. For the road bike, your numbers will be correct. For the mountain bike, use this tool to increase the reported power by "1.029%" (I got that number because 175mm cranks are 1.029% longer than 170mm cranks).
Do not use this to cheat; cheaters only cheat themselves. Your browser will remember your previous settings so you do not need to enter this every time.
**NOTE** This is only for trimming. If you are trying to ADJUST the timestamps in your GPS file, you probably want to use my timestamp tool (link). That tool lets you shift the time in your file - or create new timestamps from scratch with a designated speed. The options you see here are only from TRIMMING/CROPPING your files.
Smart Trim
The Smart Trim Button will only appear if you upload TWO (and only two) files that have more than 80% overlap. If you are merging two overlapping files, you probably didn't hit the start button in the exact same second for both devices. This button neatly trims your two activities so the start/stop time is the same for both.
Trim Start / End Time
This will be grayed out unless you check the "Trim" box. An example of when you might need to use this feature is when your GPS died after you completed 90 percent of the ride - and you just want to add in the last 10 percent of the ride from your friend's GPS. In this example, you would upload your ride and your friend's ride to the tool. You would leave your start and end time as-is. Then, on your friend's GPS track, you would copy your end time to your friend's start time. This means that the tool is going to ignore everything in your friend's file until it gets to the timestamp where your file ends.
Use Old Format
The Date Picker I am using only works on Chrome and Opera Browsers at this time. It works on Mobile Safari, but not Desktop Safari. The date picker helps you choose an appropriate Date-time range. If you cannot see the date picker, you can check this box to change to a more readable date-time format. Accepted Format could be like this May 05, 2020 13:01:06 or I can accept a format like this: 2020-05-09T13:01:06 Where 2020 is the 4 digit year, 05 is the month with leading zeros, 09 is the day with leading zeros, "T" is there to say that Time comes next. 13 is the hour in 24 hour format, 01 is the minutes with a leading zeros, and 06 is the seconds with leading zeros. The box can accept other date / time formats, but the ones I have outlined are going to be the most reliable.
IF YOU SET THE START TIME AFTER YOUR FILE ENDS (OR THE END TIME BEFORE YOUR FILE BEGINS), YOU WILL GET AN EMPTY FILE BECAUSE YOU EFFECTIVELY HAVE CROPPED THE ENTIRE FILE.
Streams
Time: Every GPS file should have at least one stream: time. If there isn't a time stamp in your file, it will not work with this tool. Everything you import into this tool is ordered by the UTC time stamp. If the time in your device is settable (and doesn't rely on GPS), you need to make sure that the time is set correctly. If it is not set correctly, your files may not overlap properly. If the time in your file is wrong, you can use my Timestamp Tool to perform a time-shift on your GPS file.
The remaining streams can be added to the final file by checking the boxes for each desired stream. By default, we include all streams - but this is not always a good idea. For example, if you are trying to merge two files that occurred at the same time (often people will record heart rate on one device and position on another), then you need to choose just one stream from each file. If you try to select position from two overlapping files, you may get wonky results!
Grayed out Streams? Certain features are only available in TCX or GPX. For example, only GPX can take temperature readings (and only Strava can interpret these - not Garmin Connect). Likewise, Distance, Calories, and Laps are only available in TCX exports. You can make choices about the distance stream down below. We offer 3 options: Leave it out, Recalculate, and Use Embedded. The only time the existing distance stream will be included is if you decide to use the embedded distance tags. See the help on those options to learn about caveats of including distance and when you want to include it. Note that this only applies to TCX and FIT file export.
Calories: Calorie export is available for TCX and FIT exports only. This is because the GPX file schema doesn't have a place to store calorie values. If you are stringing together rides end-to-end, you may want to check all of the calorie boxes. If you are merging overlapping files (such as adding heart rate from a Polar to trainer data from a Garmin), you should only select one calorie value - the one from the more reliable device. If you leave calories unchecked, Strava will recalculate calories for you based on your weight, ride speed and total elevation.
TCX vs GPX vs FIT
GPX files: Strava accepts a special type of GPX file format that allows us to embed power, cadence, heart rate, and temperature info. GPX is a great output format if you are uploading the combined file to Strava and it was an outdoor activity. Other websites may not accept this special format - so if you are having trouble with our GPX files on another website, please try TCX or FIT.
TCX files: Unlike GPX files which are strictly position based (they were invented for tracking location), the TCX file format was designed more for workouts, allowing for Heart Rate, Cadence, Power WITHOUT position being required. As such, I recommend that you use TCX format if you will be uploading a position-less file to Strava. Examples of position-less files are turbo rides, trainer rides, treadmill runs, pool swims, and indoor activities. The drawbacks to TCX are that the file size is bigger, and TCX doesn't allow temperature data. If those two items don't affect you, please go with TCX. If GPX and TCX do not work for some reason, give FIT a try.
FIT files: These can contain all sorts of data - including data that cannot be represented in GPX or TCX files. I have spent several weeks developing this option, and am now making it available early-access to my STANDARD tier Donation Supporters. **If you donated via Paypal before December 18, 2020, please use the contact link and write me with the PayPal email address you used to donate so I can send you a code for full-access to early-release features. Exporting as FIT will address the bug in Strava where your GPS type isn't always displayed properly. Also, it opens up the possibility of you overriding the total calories when you export to Strava... and the total climbing (don't cheat!) As time goes on, I hope to embed even more data in FIT file exports that cannot be expressed in GPX or TCX files.
What is "Randomize ID Tag?".
In a TCX file, Strava will read the time stamp between the <id></id> tags. If the time stamp is within a minute or two of an activity that you have already uploaded to Strava, the activity will be considered duplicate. This is the only method that Strava currently uses to determine duplicity. So, if we just move the time stamp back in time two to 15 minutes, it will appear as a new activity. If you check this box, we will randomly move the time stamp back in time. If you don't check this box, the time stamp will be the same one from the first file you uploaded. When I say "First File" I mean the activity with the earliest time; presumably your first GPS track of the day.
For GPX files, the time stamp is not in the <id></id> tags - it is in the <metadata><time></time></metadata> tags. The concept is the same; we just change that time stamp instead.
Imported GPS File Types:
My tool attempts to auto-detect your GPS type. There are two relevant numbers: The MFR ID and the Product ID. If you upload a FIT file, it should have both of these numbers, and it will match up the GPS name with the numbers/names that I have entered in my growing database (see next paragraph for discussion on this). If you upload a TCX file, it only has the Product ID - not the MFR ID. This means that if Garmin gives their device an ID of '2002' and Suunto gives their product an ID of '2002', then my tool cannot tell them apart with just a TCX file. The FIT file is the only one that has the extra information to differentiate between the two. GPX files don't have anywhere to officially store the GPS name information, however, my tool does try to search the file for clues to auto-detect GPS names. Sometimes it succeeds.
Getting a device added to the list:
There is no public list of the IDs, so I'm building it as we go along. If your device is not listed, Contact Me and I will add it. I'll need for you to email me your TCX or FIT file (GPX files are of no use). I will also need for you to tell me which Make and Model GPS you have.
Strava Special Format
Strava has given us a non-standard way to transmit the GPS name information. Note that this is only promised to work with Strava, not other websites. I can embed the name in a TCX, GPX, or FIT file. The problem, though, with GPX and TCX is that Strava has been truncating the names. For example, if I tell Strava that the user has a 'Garmin Fenix 6X Sapphire', Strava is simplifying their database and only showing 'Garmin Fenix'. I have been in contact with Strava to ask them to fix it, but only recieved automated replies so far. Fortunately, if I send to Strava as a FIT file, I can embed the MFR ID and the Product ID as discussed above. If you export using the FIT format from my tool, the device name on Strava should look the same as if you uploaded it directly from the device itself; that is one of the advantages of exporting in the FIT format. I have recently added FIT file export for my Donation Supporters. **If you donated via Paypal before December 18, 2020, please use the contact link and write me with the PayPal email address you used to donate so I can send you a code for full-access to early-release features.
Activity Type and TCX
Garmin only embeds the Activity Type in the TCX and FIT files, however Garmin Connect will ONLY Accept Running, Biking, or Other as an activity type in a TCX file. If you select one of the Strava activity types and send to Garmin Connect, it will cause a TCX upload to Garmin Connect to Fail!. If you don't want to be limited to Run/Bike/Other, you need to export as FIT; Garmin accepts more activity types in FIT Files.
Strava
If you upload to Strava without distance, Strava will recalculate your distance for outdoor workouts. For indoor workouts, it is impossible to calcuate distance, so the only way you will see distance and speed is if you choose to Embed Existing Distance.
Sites other than Strava
If you upload to sites like Garmin connect without distance, Garmin will NOT recalcuate your distance or speed. This means that if you leave the distance out, you will get a distance and speed of zero on sites like Garmin Connect.
Calculating Distance
If any of these are grayed out, it means your source files do not have either distance or position. The tool uses position to calculate disance, so if there is no position (like an indoor workout), then it is impossible to calculate distance. If none of your files have embedded distance, it will be impossbile to use embedded distance and thus it will be grayed out. Strava will calculate your distance if you choose "Do Not Embed Distance" - but Garmin Connect and other websites will not - meaning you will get a ZERO distance and ZERO speed if you leave out distance.
Do Not Embed Distance
A good choice for outdoor workouts uploaded to Strava (only Strava). If you select this option, distance will be left out of the TCX/GPX files. That is not a problem if you have GPS points because Strava will just re-calculate the distance anyway. Websites like Garmin Connect require distance, so don't choose this if you upload to a website other than Strava.
Calculate Distance
The tool will calculate the distance between every single point in your GPS file. Remember that this ONLY WORKS if you have at least one position stream selected above! If there is no position data (such as an indoor workout) it is not possible to calculate distance. An example of a file with no position data could be an indoor workout or turbo/trainer file. Now you can also Ignore Big Gaps. Let's say you want to combine two rides with a ferry ride in the middle - but do not want the ferry ride distance to show on Strava. Using the default settings, if the time between points is more than 10 minutes AND the distance between points is more than five miles, when you check this box, the accumulated distance will be removed from the TCX file. This only applies to TCX and FIT because GPX does not support accumulated distance.
**If you choose to ignore gaps of as little as 2 seconds or 10 seconds, you can effectively add fine granularity of stopped time to your activity. 2 seconds works if you have 1 second recording turned on... and 10 seconds should be perfect for "smart recording". The only issue with using these options is that if you have a lot of gaps greater than these thresholds (such as in a longer activity), the tool may run very slowly - perhaps crashing and giving you a 500 error. If you get a 500 error with this feature enabled, try going up to the next highest value.
Use Existing Embedded Distance
The best choice for indoor workouts. If you are trying to merge Heart Rate file with a turbo/trainer/treadmill workout file.... and the files overlap (i.e. they happened at the same time as opposed to end-to-end), you will want to select this option. This will use the distance data already present in your file so you get credit on Strava. If you choose this option, make sure that you choose ONLY ONE distance stream in the table. If you check multiple distance streams, you will get very strange results! **If there are not any distance streams in any of your files, this option will be grayed out. **Important Note: If you are merging end-to-end files (as opposed to overlapping files), and not all of your end-to-end files have a distance stream, I recommend that you use the "Calculate Distance" option instead of "Use Embedded Distance." You may need to try both options to get the result you want.
Overlapping Tracks
Some files may overlap. This may be intentional if you're using two devices on a trainer (for example). Maybe you're recording speed with a Garmin and heart rate with a Polar. In other instances, the overlap may be less intentional. For example, maybe you see that your Garmin is on 1% battery, so you decide to start recording on your iPhone before the Garmin dies. Either way, we need to decide how to deal with the overlap.
The first option is to Keep All Trackpoints. I suggest you try this option first. If you have trouble uploading the resulting file to a 3rd party site, try the Remove Duplicate Trackpoints option. I have tested on Strava and Garmin Connect, and this option works. This option takes all of your selected streams from both devices, and if they both have recorded a point at the same second, a duplicate entry goes into the final file. I did some testing, and Strava accepts this. I even tested with two overlaid position files, and saw some micro-zig-zagging due to the slight position differences between the two GPS units. Programs other than Strava may not accept the Keep All Trackpoint option because you really should only have one entry per second.
The second option is to Remove Duplicate Trackpoints. This will prioritize the streams from the first file (that would be the uppermost file in the graph). You will be losing some data. I tried this with two Garmin GPS units running at the same time, and I found that the losses did not affect the final recording in a big way. Removing duplicates should also result in a smaller file, and choosing this option may fix problems encountered when uploading to certain 3rd party websites.
The third option is to Only Include Trackpoints that have Position. I found that some platforms have trouble with "missing data." Let's say that your heart rate device records a point every second, but your GPS device is on Smart Recording, and only records every few seconds. If I try to include all of the data, there will be trackpoints that only have heart rate data - but no position data. Each platform handles this differently. Strava and Garmin Connect do not seem to have an issue with this. Other platforms may give you exceedingly high distance. If that is the case, give this option a try.
Discard Trackpoints
Did you do an activity that was so big that Strava rejected it? This can happen with very long activities - especially when you have 1 second recording turned on. Use this dropdown to select how often the tool should discard track points until the file is small enough to be accepted by Strava. I recommend that you always use Smart Recording instead of 1 second Recording unless you're doing a very short activity.
Send To Strava
We can upload directly to Strava on your behalf. The first time, you will need to click the "Connect With Strava" button. Strava will ask you if you want to give us permission to make uploads on your behalf. If you agree, in the future, you can just check this box (it will remain checked and saved in your cookies as a preference), and the file will go directly from our website to Strava's. This will save you from having to download the file and then uploading it again.
If you are having trouble uploading to Strava, please Reset Your Connection with Strava. We are migrating people to a more secure connection to Strava, so if you haven't used GOTOES tools since March 23, 2019, we recommend that you reset your connection and re-authorize GOTOES. Your old authorization will stop working October 2019.
Cannot Time Shift
It looks like the original file did not have any time stamps in it, but you tried to do a time-shift. Time Shift looks at the original time stamps, and adjusts them by a certain amount. If there aren't any time stamps in your file, it is impossible to shift them all differentially. You will end up with all the points at exactly the same time, which is going to be a corrupted file.
Time Shift.
If you check the Time Shift box and your GPX file has time stamps in it, the tool will set the very first point in your ride to the time stamp you supply in "Activity Start Time." It will then calculate the difference in time between the time you supplied and the time provided in the track. It will apply that time-shift to every point in the track. This way, the exact speed you traveled is maintained; the only difference is the time that you did it. If you select this option, "Desired Average Speed" and "Use Elevation in Calculating Speed" will be ignored (and grayed out). The time zone you supply is important - if you supply the wrong time zone, your track may be time-shifted by more (or less) than you expect.
Time Shift Multiple Files
Currently, if you upload multiple files to the tool, and time-shift them, it will use the start time of the very first file in the sequence, and then shift ALL of your files according to that start time - so they will maintain their original order. I have considered making an option so that if you do a time shift on multiple files, the tool will have each file begin at the time you specify - so they would lose their sequence. If that is something you need, please contact me and I may add it.
Desired Average Speed.
This works by the tool taking each and every point and analyzing the distance between them. If you do not select to use the elevation when calculating speed, the tool just takes a simple distance over time calcuation to produce a speed. If you select the bike or run option, the tool uses a complicated formula that includes smoothing between points to try and produce an accurate speed between each individual point. The accuracy of this output relies heavily on your track. If your track has points that are very far apart, you're going to want to use the Interpolate / Add Trackpoints option (you will see this option on the next page). If your points are too close together, you could have some speed spikes that are impossibly fast, so you will want to reduce the number of trackpoints to increase the accuracy. If you leave this field blank, the tool will just assume 20 miles per hour.
Kilometers or Miles Per Hour.
Here you tell the tool if the number you entered in the Desired Average Speed field is in Miles per hour or Kilometers per hour. If you leave this field blank, the tool will just assume 20 miles per hour.
What is "Use Elevation in Calculating Speed?".
If you check the "No" option, the tool will spit out a track that is nearly a flat line in terms of speed. If you enter 6mph here, you ought to see 6mph on your final Strava Track. If there are hills, and you specify 20mph, you will be climbing the hills at 20mph. That is not very realistic, which is why there is a Bike and Run option. As the grade increases, the tool will slow down the speed of the track. There are two different ways to calculate the speed - one for bike, and one for run. They are not perfect, but I have attempted to make them as realistic as possible. If you find that your moving time is much less than your elapsed time, make sure that you select the "Interpolate Tracks (Add Points)" option, which appears on the next page. Note that this algorithm is tailored for moderate road cycling. Note that your downhill speeds might be higher than is realistic for windy roads or off road rides. Similarly, I tried to make the run calculations as realistic as possible - but terrain can really influence your actual speed on the trail.
Reverse Route
If you check this box, the tool will take the start time you selected and put it on the LAST track point as opposed to the first track point. From there, it will count backwards applying speed to every trackpoint. I realize that this means that the start time of your reversed track will actually be the end time. I am trying to think of an easy way to reverse the track and get the start time reversed, but for most applications, this should be good for now.
How To Import Gpx File Into Strava App
Source: https://gotoes.org/strava/Add_Timestamps_To_GPX.php
Posted by: connorsseent1983.blogspot.com
0 Response to "How To Import Gpx File Into Strava App"
Post a Comment